
This blog was originally published on the author’s substack.
Introduction
Every organization building applications on OLTP databases eventually seeks to deliver actionable insights to its users. However, many of these organizations continue to extract analytics directly from their OLTP databases, often due to a smaller footprint, limited resources, or lack of scalable alternatives.
When presenting insights to end-users, it’s crucial to ensure both accuracy and an exceptional experience. Companies like LinkedIn and Uber have demonstrated the transformative power of leveraging data to enhance user experiences, ultimately driving their growth into multibillion-dollar businesses. At StarTree, we aim to empower organizations of all sizes to achieve the same by dramatically reducing the cost per query ($/query), enabling anyone to unlock and present valuable insights from their data.
This recipe demonstrates how organizations can seamlessly bring data from their OLTP systems into an OLAP system powered by Apache Pinot and StarTree Cloud. By doing so, businesses can transform operational data into real-time insights, creating meaningful, scalable, and efficient experiences for their end-users.
Database variants and compatibility
The solution outlined in this recipe supports real-time analytics on a wide range of databases, offering flexibility across both self-hosted and cloud-managed environments. Popular self-hosted databases include MySQL, PostgreSQL, MariaDB, Oracle, Cassandra, MongoDB, Informix, SQL Server, IBM DB2, and Vitess. For cloud-managed solutions, AWS Aurora and RDS provide robust options for scalability and ease of use, supporting multiple database engines.

In this blog, we tested the following databases: Aurora MySQL, Aurora PostgreSQL, RDS SQL Server, and Atlas MongoDB. As we continue to expand support for additional databases, relevant configurations and instructions will be added to our GitHub repository.
Architecture overview

Key architecture considerations
This recipe demonstrates a high-level architecture where Change Data Capture (CDC) from a source database is pushed into a streaming platform (e.g., Kafka via MSK), and ultimately ingested into Apache Pinot or StarTree Cloud for real-time analytics. While the architecture is versatile, here are some key considerations to keep in mind:
- CDC mechanism:
- Use Debezium as the connector technology to reliably capture database changes in real time. Debezium supports various databases and CDC methods like binlogs, WAL, and change streams, making it a flexible choice for different environments.
- Be mindful of configuration factors such as the number of tasks in MSK Connect, topic partitions, and the data region for optimal performance and cost management.
- For more details on supported databases and versions, check the Debezium Releases page.
- Data handling:
- Leverage UPSERTS in Pinot or StarTree Cloud to ensure CDC streams do not create duplicates downstream.
- For append-only scenarios, adjust topic configurations and downstream table schemas to align with your analytics requirements.
- Scalability:
- Use managed services like MSK Connect and Debezium to simplify scaling as data volume grows.
- Consider partitioning Kafka topics thoughtfully to balance load and maintain throughput.
- Cost:
- MSK costs: Broker instance size (e.g., kafka.m7g.large), number of brokers, and topic storage costs contribute to your MSK bill.
- MSK Connect costs: vCPU usage per connector task and log delivery to CloudWatch add to costs.
- Data transfer costs: Intra-region data transfers (free between MSK and Connect) are economical, but inter-region transfers can increase costs significantly.
- Source database costs: Enabling CDC (e.g., binlogs for MySQL) may increase database storage and I/O costs.
- Security: The recipe uses public networks for simplicity on StarTree Cloud, but for production, this workflow can be fine-tuned to configure VPC peering or PrivateLink along with enforcing AWS IAM authentication to secure communication and access between components.
Setup guide
The process of setting up a OLTP database to stream CDC data in real-time to StarTree Cloud can be done in these simple 7 steps:

- Configure the source database.
Enable Change Data Capture (CDC) by configuring WAL logs and setting up the necessary security groups.
- Prepare and upload the Debezium connector.
Download the Debezium connector JAR files for MySQL, PostgreSQL, or other databases, package into a ZIP file and upload to an AWS S3 bucket.
- Set up an Amazon MSK cluster.
Create a Kafka cluster in Amazon MSK with TLS encryption and IAM authentication and configure the security group rules to allow the required inbound and outbound traffic.
- Deploy the MSK Connect connector.
Use the uploaded custom Debezium plugin to create and configure a connector in MSK Connect.
- Ingest data into StarTree Cloud.
Create a schema and table config in StarTree Cloud to define the structure of the CDC data and pull data from MSK topic.
- Validate the setup.
Wait for the MSK Connect connector to show a green “Running” status. Verify that data is flowing into StarTree Cloud by querying the table for recent records.
- Analyze data in real-time.
Use StarTree Cloud’s querying capabilities to run subsecond analytics queries and connect visualization tools like Grafana to create dashboards for real-time insights.
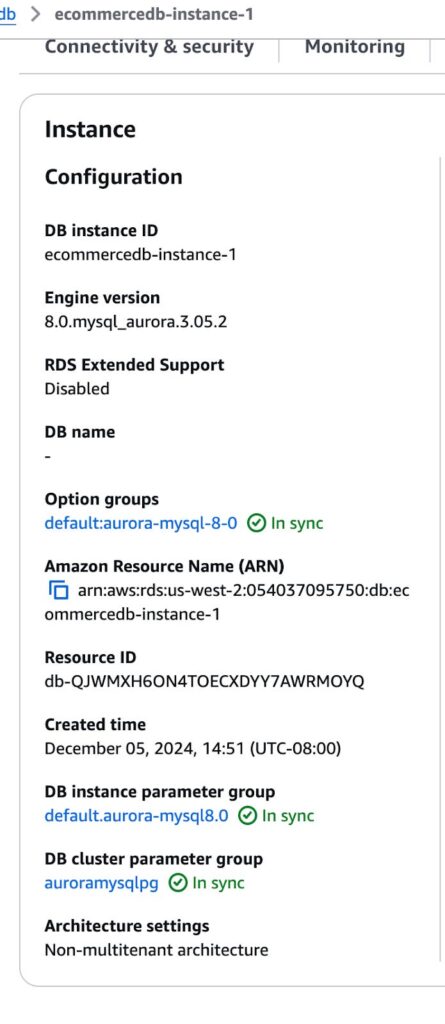
1. Configure source database
In this section, we will configure an Aurora MySQL-Compatible database in AWS RDS to enable Change Data Capture (CDC) via binlogs. While the example focuses on Aurora MySQL, the steps are similar for RDS MySQL or self-hosted MySQL environments.
1.1 Create a new parameter group
- Create a parameter group
- In the AWS Console, navigate to RDS > Parameter groups.
- Click Create parameter group and choose the correct DB family for your Aurora MySQL engine version (e.g., aurora-mysql8.0).
- Provide a name (e.g., auroramysqlpg) and description for the parameter group.
- Enable binlog format
- Locate the binlog_format parameter in the newly created parameter group and set it to the appropriate format.
- The binlog_format parameter determines how MySQL records database changes in the binary log (binlog). This log is critical for replication, point-in-time recovery, and real-time change data capture (CDC).
- binlog_format can be one of three types:
- ROW: Writes events at the row level. This is typically preferred for CDC use cases because each change is recorded at the individual row level, offering the most granular capture of data changes.
- STATEMENT: Captures only the SQL statements that lead to data changes. While more space-efficient, statement-based replication can be less accurate in certain scenarios (e.g., non-deterministic functions).
- MIXED: Uses a combination of STATEMENT and ROW formats. Depending on the type of SQL operation, MySQL will switch between statement-based and row-based logging.
- For most CDC scenarios, ROW is recommended to ensure complete and accurate capture of all changes.

- Attach the parameter group to your DB cluster
- Go to Databases in the RDS Console.
- Select your Aurora MySQL DB Cluster, then under Actions, choose Modify.
- In the Database options or Cluster configuration section, update the DB Cluster Parameter Group to the new parameter group (e.g., auroramysqlpg).
- Save your changes.
- If the status shows “requires reboot,” right-click on the DB instance and select Reboot to apply changes.
1.2 Configure security group for inbound traffic
Your Debezium connector and MSK Connect tasks need network connectivity to the Aurora MySQL instance over port 3306. Set up or modify a security group to allow inbound traffic on port 3306 from your connector or trusted IP addresses:
- Create or modify a security group
- In the EC2 Console > Security Groups section, click Create security group or select an existing security group.
- Under Inbound rules, add a rule for MySQL/Aurora (3306).
- Specify your connector instance’s IP range or a trusted CIDR range. If you are testing, you can allow All inbound traffic to port 3306, but this is generally not recommended for production environments.

- Associate the security group
- Ensure that this security group is associated with your Aurora MySQL DB instance so that it receives traffic on port 3306.
1.3 Enable public access (optional)
- If your Aurora MySQL instance or RDS MySQL instance should be reachable from outside a VPC (e.g., for testing or from a SaaS service), enable Public Access during the DB creation. This scenario is if you like to test it from your local machine. It is not recommended for production use.
- You can also configure a VPC Peering or PrivateLink setup if you prefer to keep your database private.
1.4 Confirm endpoint and create test table
- After the DB instance is up and running, retrieve the Endpoint (usually your writer endpoint for Aurora) from the RDS Console.
- Use this endpoint when configuring Debezium or other CDC tools to connect to your Aurora MySQL instance.
- As a final check, create a sample table and insert sample rows. This will help confirm that binlogs are being captured as expected once we configure the Debezium connector.
2. Prepare and upload the Debezium plugin
After configuring your source database for CDC, the next step is to prepare the Debezium connector files that MSK Connect will use to create the custom connector. This involves downloading the Debezium MySQL connector artifact, creating a zip package, and uploading it to Amazon S3 as a custom plugin.
A custom plugin in MSK Connect is a packaged set of JAR files that provide the implementation of one or more connectors, transforms, or converters. Amazon MSK will install this plugin on the worker nodes of the connect cluster where the connector is running.
2.1 Download the Debezium connectors
- Choose your Debezium release
- We are using Debezium 2.3, which is compatible with Kafka 3.5, 3.4, 3.3, 3.2, 3.1, 3.0, 2.8.1+.
- Debezium 2.3 supports:
- MySQL 5.7/8.0 (including Aurora MySQL)
- PostgreSQL 10+ (including Aurora PostgreSQL)
- SQL Server 2017/2019/2022
- MongoDB 4.0+
- Obtain the connector JARs
- Visit the Debezium GitHub Releases or Maven Repository to download the JARs you need:
- MySQL: debezium-connector-mysql-2.7.1.Final.jar
- PostgreSQL: debezium-connector-postgres-2.7.1.Final.jar
- SQL Server: debezium-connector-sqlserver-2.7.1.Final.jar
- MongoDB: debezium-connector-mongodb-2.7.1.Final.jar
- Visit the Debezium GitHub Releases or Maven Repository to download the JARs you need:
- No additional dependencies required
- Typically, Debezium connectors might require additional libraries (e.g., a JDBC driver). However, for AWS IAM Auth, MSK Connect already provides the necessary modules when using IAM authentication—no extra JARs are needed.
- If you only plan to capture one database type (e.g., MySQL), you only need that single .jar.
2.2 Package the connector into a single archive
- Create a directory structureFor example, if you plan to capture changes from MySQL:
debezium-2.7/├── debezium-connector-mysql-2.7.1.Final.jar- If you want to include SQL Server or MongoDB connectors, just place those JARs in a similar directory structure, we need to create separate connectors for each database.The downloaded connector is often in TAR or TAR.GZ format. Since MSK Connect requires plugins in ZIP or JAR format, convert the archive:
tar -xvf debezium-connector-mysql-2.7.1.tar.gz - Zip the filesMSK Connect requires a single archive containing all connector artifacts:
cd debezium-2.7

zip -r debezium-2.7-plugin.zip- This .zip file is what you’ll reference when creating the custom plug-in in MSK Connect.
2.3 Upload the archive to an Amazon S3 bucket
- Upload the archiveExample AWS CLI command:
aws s3 cp debezium-2.7-plugin.zip s3://my-connector-plugins/debezium-2.7-plugin.zip- Take note of the S3 URL (for example, s3://my-connector-plugins/debezium-2.7-plugin.zip).
2.4 Compatibility matrix
Below is a sample compatibility matrix that provides a generation guideline to help you quickly identify which Debezium release works best with your Kafka version and database engine. For each database environment (e.g., only MySQL), choose the newest Debezium release (3.x) that is within a tested Kafka range.
NOTE: If you’re on Debezium 1.x and need features in 2.x, plan your upgrade carefully, as some configuration properties have changed.
Always review release notes for any connector-specific changes (e.g., new snapshotting behaviors, renamed config properties).
For the workflow demonstration, we used Debezium MySQL Connector 2.7.1, Debezium SQL Server Connector 2.7.4, Debezium PostgreSQL Connector 2.1.7, and Debezium MongoDB Connector 2.7.4—all running on Apache Kafka Connect 2.7.1. These versions worked seamlessly to capture and stream database changes across multiple data sources, validating the versatility and reliability of the Debezium CDC solution.
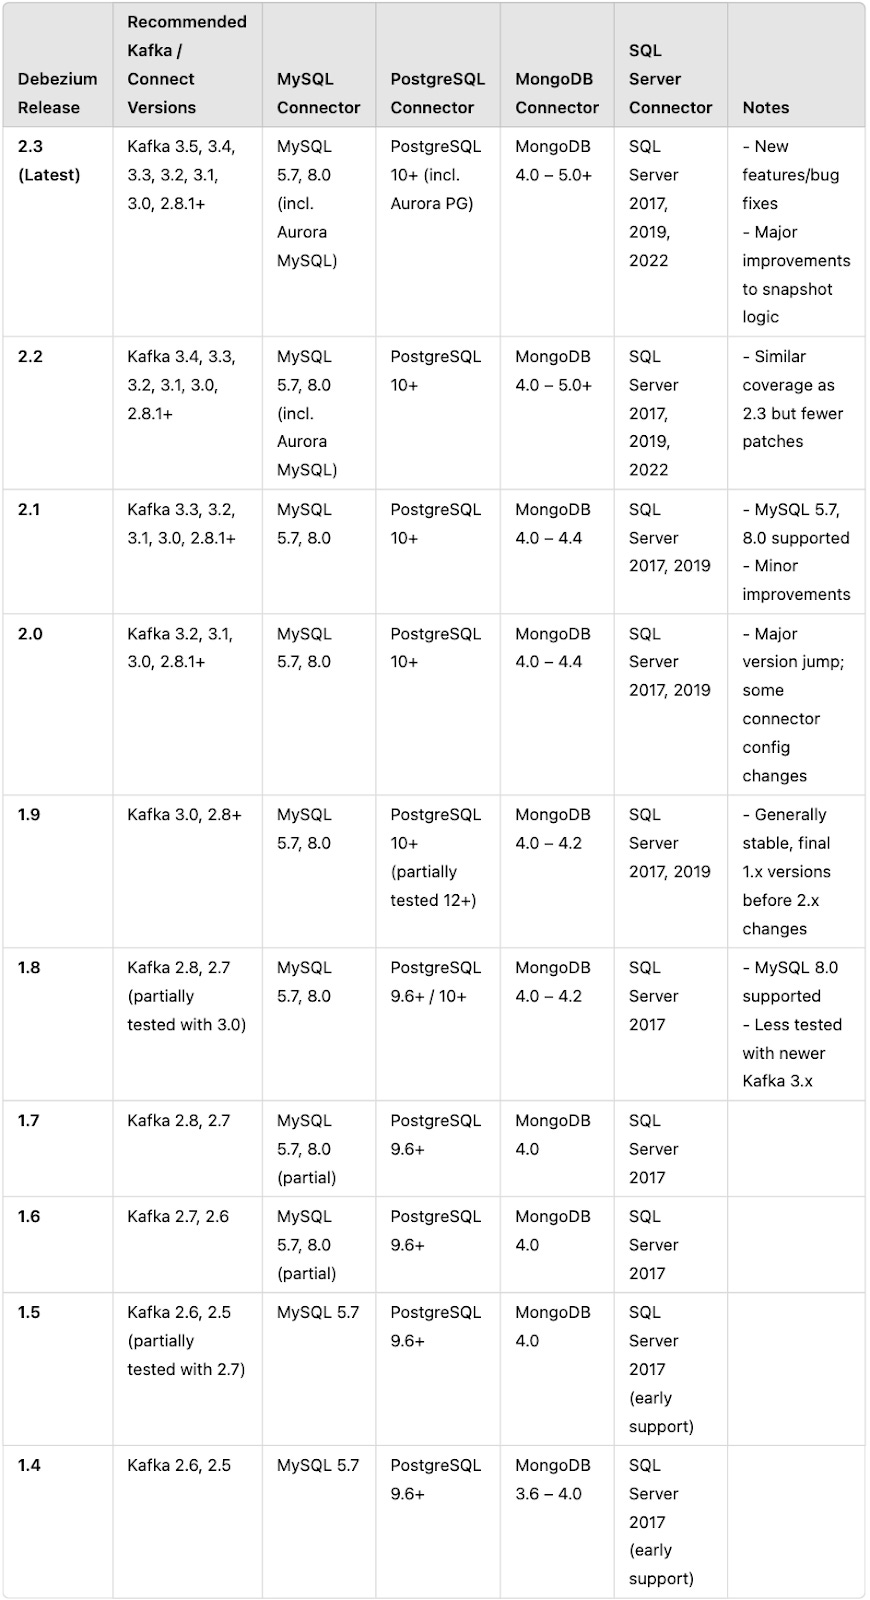
Refer to this table as a general guideline, but always check the official Debezium documentation for detailed and up-to-date information on version compatibility with specific databases and Kafka versions.
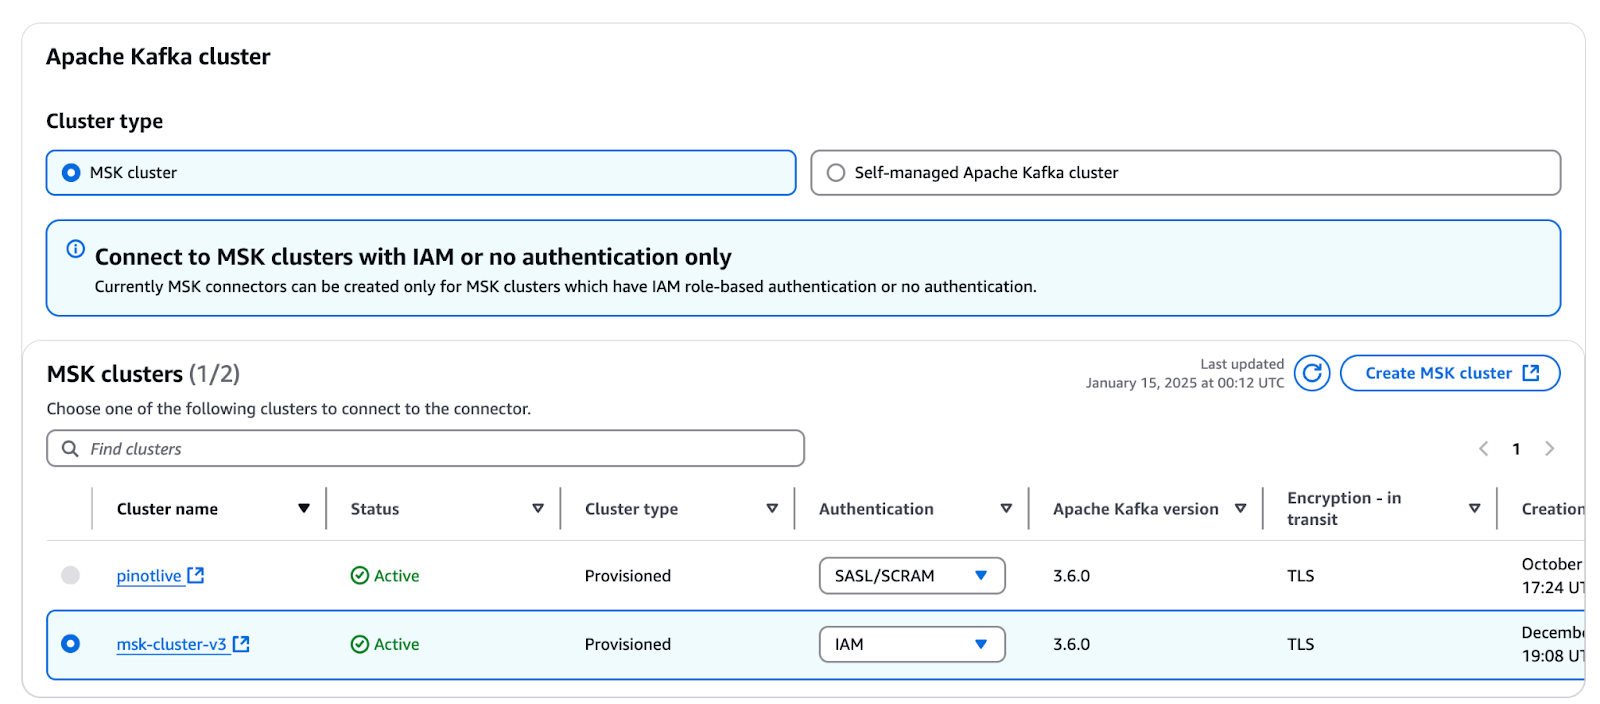
3. Create or access your MSK cluster
Creating an Amazon MSK cluster is a critical step in setting up your CDC workflow. This section walks you through the steps required to create an MSK cluster tailored to your data volume, use case, and security requirements.
3.1 Choose cluster configuration
When creating an MSK cluster, the configuration will depend on the data volume and the frequency of changes in your source database. Here’s what to consider:
- Number of brokers
- Select the number of brokers based on your workload. For this setup, we use 3 brokers, with one broker per availability zone for high availability.
- Broker instance type
- Choose the instance size depending on the anticipated data throughput. For this setup, we use kafka.m7g.large, which is optimized for moderate workloads.
- Apache Kafka version
- Amazon MSK supports multiple Kafka versions. For this setup, we use Apache Kafka version 3.6.0 to ensure compatibility with the latest features and the Debezium connectors.
- Data encryption
- Enable TLS encryption for in-cluster communication to ensure secure data transfer.
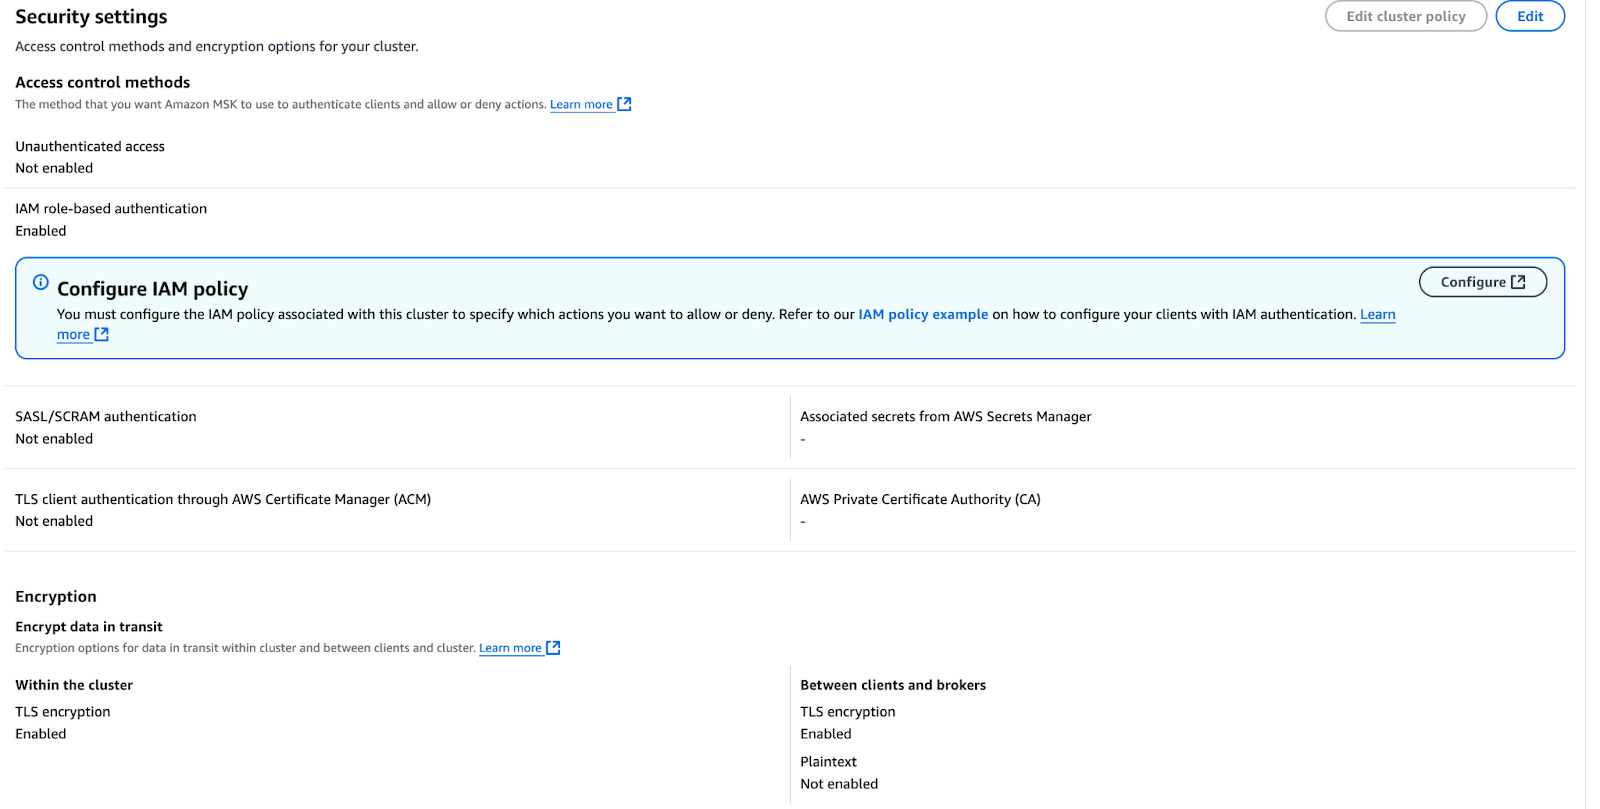
3.2 Configure security settings
- Authentication method
- MSK Connect supports two authentication modes:
- No Authentication: Simplest but not secure.
- IAM Authentication: Recommended for secure setups.
- SCRAM Authentication is not supported for MSK Connect, so avoid using it for this configuration.
- MSK Connect supports two authentication modes:
- Cluster visibility
- If your MSK cluster needs to interact with public networks, enable public access with IAM authentication.
- Recommendation: Public access is not recommended for production environments. Instead, keep the cluster private and implement VPC peering or PrivateLink for secure inter-VPC communication.
- For this setup (to connect with StarTree Cloud, which operates in a public network), we configure the MSK cluster with public access and enable IAM authentication.
- Security group rules
- Edit the default security group for your MSK cluster:
- Inbound Rules:
- Allow traffic on port 9098 (Kafka protocol).
- Allow traffic on port 27017 (for MongoDB connector access).
- Outbound Rules:
- Allow traffic on port 27017 for MongoDB.
- Inbound Rules:
- Edit the default security group for your MSK cluster:
3.3 Create the MSK cluster
- Steps to create:
- Navigate to the MSK Console in AWS.
- Click on Create cluster.
- Choose Custom Create and configure the following:
- Cluster Name: Provide a unique name (e.g., cdc-cluster-demo).
- Broker Type: kafka.m7g.large.
- Number of Brokers: 3 (one broker per availability zone).
- Kafka Version: 3.6.0.
- Encryption: Enable TLS encryption for in-cluster data transfer.
- Configure IAM Authentication.
- Set Cluster Access to public for this setup (only for testing or non-production use cases).
- Important: This can also be configured after the cluster is created by modifying the cluster’s network settings in the MSK Console.
- Wait for the cluster to be ready:
- Once the cluster creation process is complete, note the bootstrap servers for use in your connector setup.
- Once the cluster creation process is complete, note the bootstrap servers for use in your connector setup.
3.4 Configure IAM role for MSK Connect
To allow MSK Connect to access the MSK cluster and other AWS services, create an IAM role with the required permissions:
- Create an IAM role
- Go to the IAM Console and create a new role.
- Under Trusted Entity, select AWS Service and choose Kafka Connect (kafkaconnect.amazonaws.com) as the trusted service.
- Attach the following policies to the role:
- AmazonMSKFullAccess: Grants full access to MSK resources.
- AWSMSKReplicatorExecutionRole: Provides MSK replication capabilities if needed.
- AdministratorAccess (optional, for testing only).
- Trust relationship policyEnsure the following trust relationship is defined in the IAM role:
{ "Version": "2012-10-17", "Statement": [ { "Effect": "Allow", "Principal": { "Service": "kafkaconnect.amazonaws.com" }, "Action": "sts:AssumeRole" } ] } - Assign the IAM role
- When setting up your MSK Connect connector, use this role to provide the necessary permissions.

- When setting up your MSK Connect connector, use this role to provide the necessary permissions.
4. Configure MSK Connect
This step brings all the components together to stream change data capture (CDC) events from your source database into the MSK cluster. Follow the steps below to configure MSK Connect and deploy the connector.
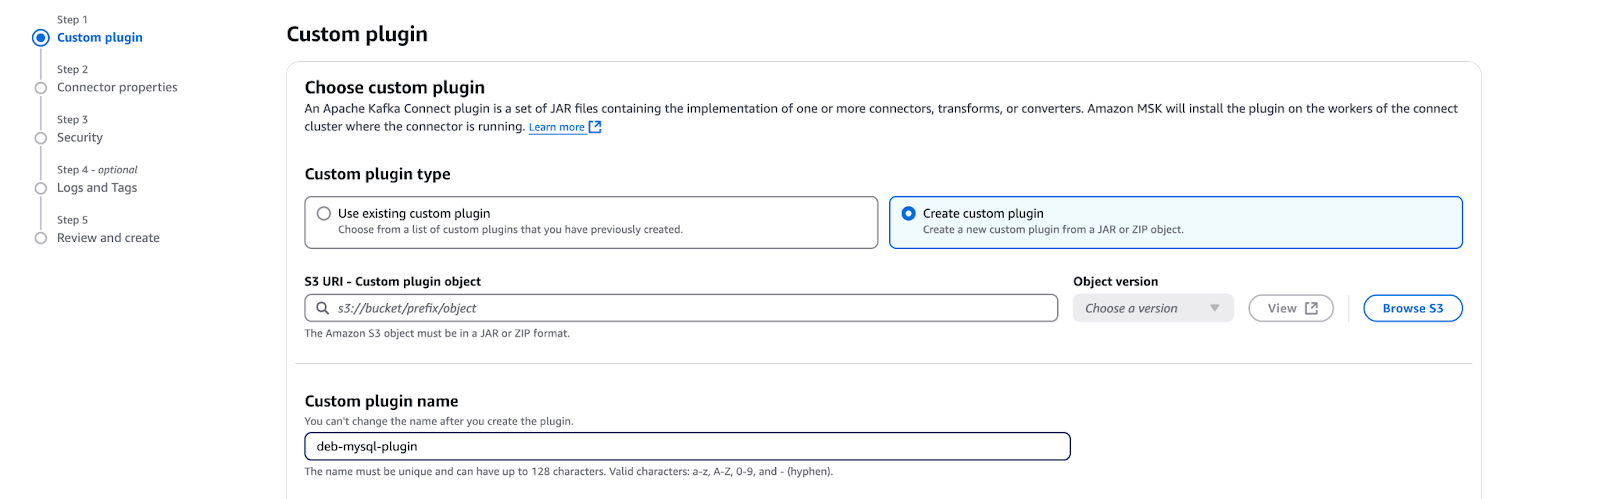
4.1 Create a custom plugin
- Browse JAR files from S3:
- In the MSK Connect Console, go to Custom Plugins and choose Create Custom Plugin.
- Browse and select the JAR files uploaded to Amazon S3 in the previous step (e.g., debezium-mysql-2.7.1-plugin.zip).
- Validate and create the custom plugin.
4.2 Configure connector properties
- Connector name:
- Provide a unique name for your connector, such as Debezium-MySQL-CDC.
- Select MSK cluster:
- Choose the MSK cluster created in the previous step.
- Worker configuration:
- You can either use the default worker configuration provided by Amazon MSK or create a new custom worker configuration:
- Custom worker configuration: Use JSON converters for this setup because the default configuration uses string converters, which may not fit your requirements.
- Custom worker configuration: Use JSON converters for this setup because the default configuration uses string converters, which may not fit your requirements.
- You can either use the default worker configuration provided by Amazon MSK or create a new custom worker configuration:
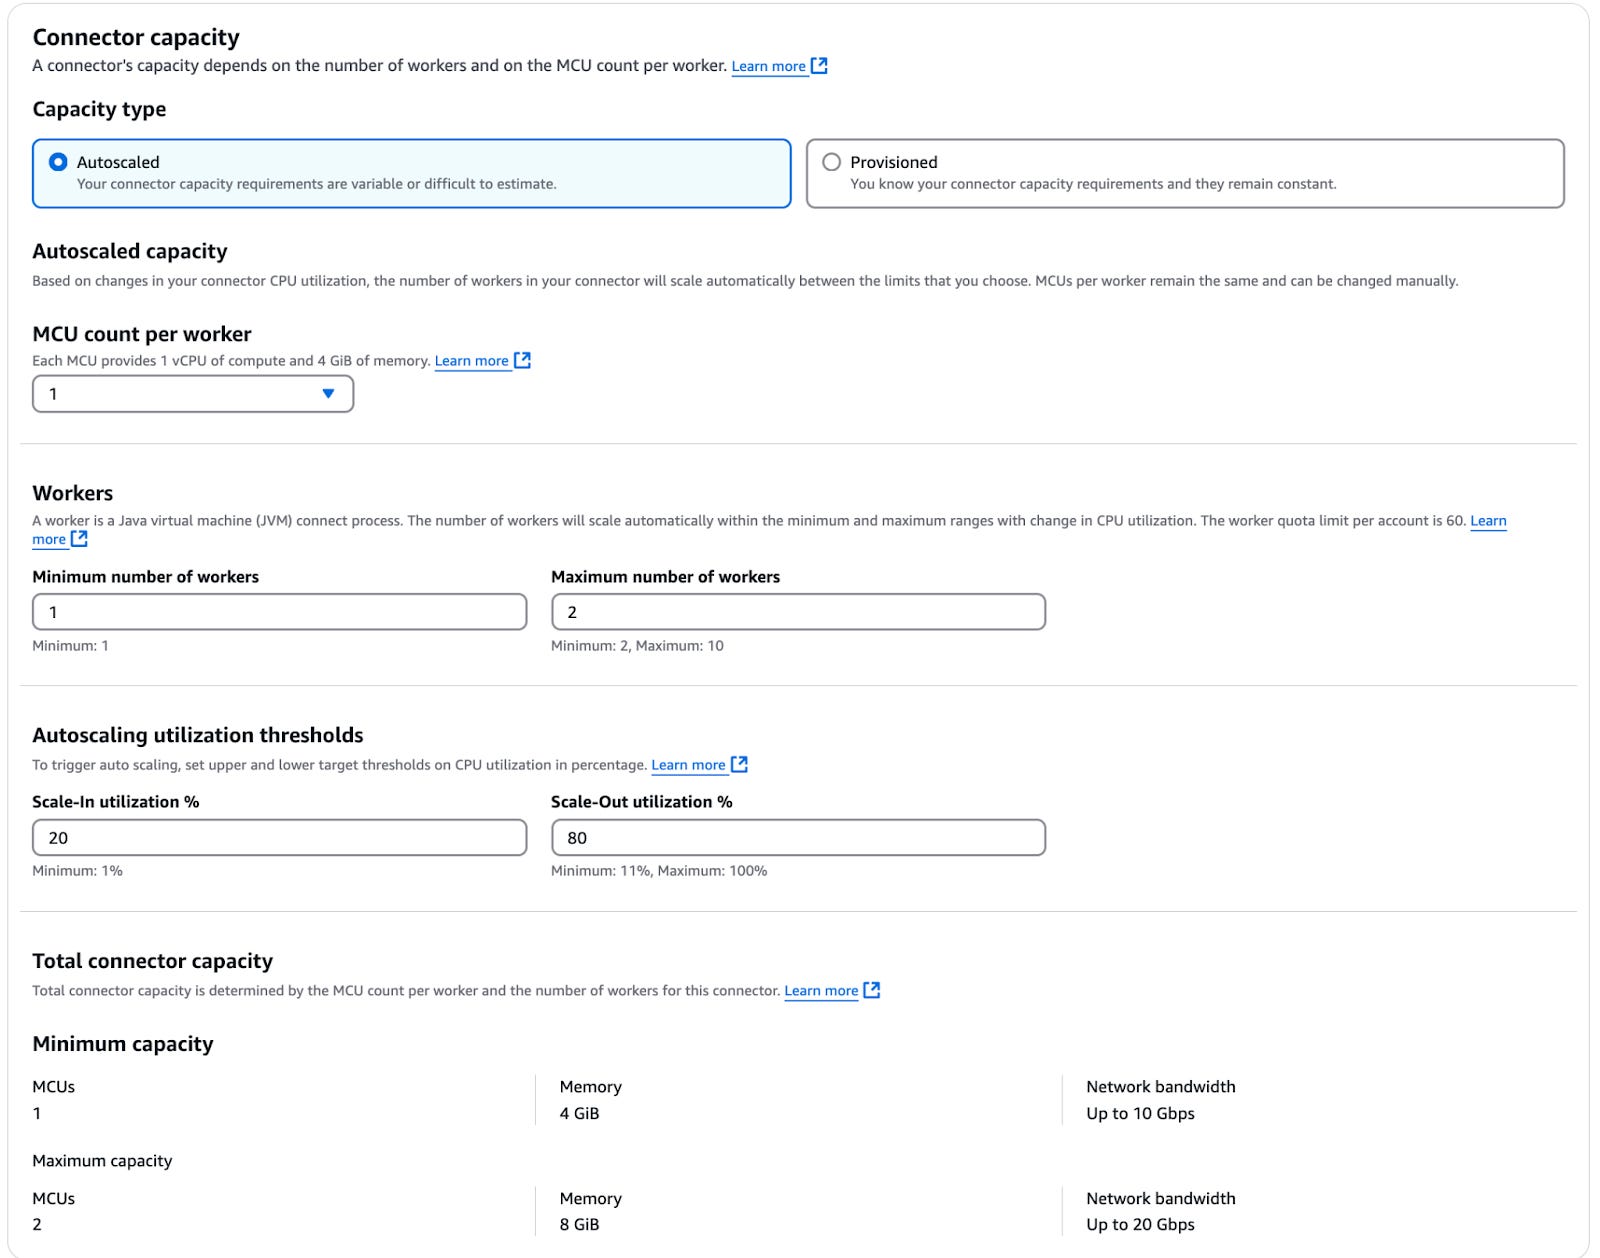
4.3 Choose capacity mode
Amazon MSK Connect offers two capacity modes: Autoscaled or Provisioned.
- Autoscaled capacity:
- Configure the following parameters:
- MSK Connect Unit (MCU) count per worker: Each MCU provides 1 vCPU and 4 GB of memory.
- Minimum and Maximum Workers: Define the range for autoscaling.
- Autoscaling Utilization Thresholds: Set the upper and lower target utilization thresholds in percentage to trigger autoscaling.
- Configure the following parameters:
- Provisioned capacity (recommended for Debezium):
- The Debezium connector supports only 1 task per connector, meaning it cannot use multiple workers per connector. Autoscaling workers per connector will not work.
- A custom worker configuration can be found here.
- Instead, use Provisioned Capacity mode and increase the number of MCUs as needed to scale up your connector.
4.4 Configure Debezium connector properties
Below are the configuration properties used for the Debezium connectors with Aurora MySQL database. Configuration for Aurora PostgreSQL, RDS SQL Server and Atlas MongoDB can be found in this Github Repository.
MySQL connector configuration:
# -------------------------------------------------

# Connector Configuration

# -------------------------------------------------

connector.class=io.debezium.connector.mysql.MySqlConnector # Specifies the connector class for MySQL CDC.

tasks.max=1 # Maximum number of tasks. Debezium supports only 1 task per connector.

database.hostname=<Hostname of the MySQL database server>

database.port=3306 # Port number for the MySQL server.

database.user=<Username to connect to the database>

database.password=<Password for the database user>

database.server.id=12345 # Unique numeric identifier for this connector instance (used in MySQL replication).

database.server.name=<Logical name for the server, used as a topic prefix in Kafka>

database.include.list=<Comma-separated list of databases to capture changes from>

snapshot.mode=initial # Determines how the initial snapshot is taken (e.g., "initial", "schema_only").

# -------------------------------------------------

# Kafka Schema History Configuration

# -------------------------------------------------

schema.history.internal=io.debezium.storage.kafka.history.KafkaSchemaHistory # Specifies the class for schema history storage (Kafka).

schema.history.internal.kafka.bootstrap.servers=<Kafka bootstrap servers>

schema.history.internal.kafka.topic=<Kafka topic where schema history is stored>

schema.history.internal.producer.security.protocol=SASL_SSL # Security protocol for schema producer (e.g., TLS with SASL).

schema.history.internal.consumer.security.protocol=SASL_SSL # Security protocol for schema consumer (e.g., TLS with SASL).

schema.history.internal.producer.sasl.mechanism=AWS_MSK_IAM # SASL mechanism for producer authentication.

schema.history.internal.consumer.sasl.mechanism=AWS_MSK_IAM # SASL mechanism for consumer authentication.

schema.history.internal.producer.sasl.jaas.config=software.amazon.msk.auth.iam.IAMLoginModule required; # IAM configuration for producer.

schema.history.internal.consumer.sasl.jaas.config=software.amazon.msk.auth.iam.IAMLoginModule required; # IAM configuration for consumer.

schema.history.internal.producer.sasl.client.callback.handler.class=software.amazon.msk.auth.iam.IAMClientCallbackHandler # Callback handler for producer authentication.

schema.history.internal.consumer.sasl.client.callback.handler.class=software.amazon.msk.auth.iam.IAMClientCallbackHandler # Callback handler for consumer authentication.

# -------------------------------------------------

# Topic and Logging Configuration

# -------------------------------------------------

topic.prefix=<Prefix for all Kafka topics created by this connector>

include.schema.changes=true # Captures schema changes and sends them to Kafka topics.

log4j.rootLogger=DEBUG, stdout # Default logging level for the connector.

log4j.logger.org.apache.kafka.connect.runtime.distributed=DEBUG # DEBUG-level logging for Kafka Connect runtime in distributed mode.

log4j.logger.org.apache.kafka.clients=TRACE # TRACE-level logging for Kafka clients.

log4j.logger.io.debezium.schema=DEBUG # DEBUG-level logging for schema-related events in Debezium.

log4j.logger.org.apache.kafka.common.network=TRACE # TRACE-level logging for Kafka network interactions.

log4j.logger.io.debezium=DEBUG # DEBUG-level logging for Debezium-related operations.

log4j.logger.io.debezium.connector.mysql=TRACE # TRACE-level logging for the MySQL connector.

log4j.logger.org.apache.kafka.common.security=TRACE # TRACE-level logging for Kafka security modules.

log4j.logger.org.apache.kafka.common.security.sasl=TRACE # TRACE-level logging for SASL authentication modules.

log4j.logger.org.apache.kafka.connect.runtime.WorkerSourceTask=DEBUG # DEBUG-level logging for Kafka Connect source tasks.

log4j.logger.software.amazon.msk.auth=DEBUG # DEBUG-level logging for AWS MSK IAM authentication.Code language: HTML, XML (xml)
4.5 Configure authentication and encryption
- Access permissions:
- Assign the IAM role created in the previous step to the connector for access permissions.
- Access control:
- Access control method: IAM role-based access control (RBAC) is recommended for secure authentication with the MSK cluster.
- Encryption in transit:
- TLS encryption: Data transfer between Kafka brokers and MSK Connect workers is secured using TLS.
- Note: These settings are automatically configured to ensure secure connectivity with your MSK cluster.
4.6 Configure log delivery
- Enable log delivery:
- Create and assign a CloudWatch log group to the connector for monitoring and troubleshooting.
- Ensure that your log delivery group is properly configured to capture logs for debugging purposes.
5. Ingest data into StarTree Cloud
Once your CDC data is available in MSK brokers, it is ready for consumption by StarTree Cloud. The following steps outline how to create a schema and table configuration to ingest the data, focusing on a PostgreSQL CDC topic with a payload structure.
5.1 Understanding the CDC payload structure
The PostgreSQL CDC topic produces messages with the following structure:
{
"before": null,
"after": {
"pk": "1",
"value": "New data"
},
"source": {
"...": "...",
"snapshot": "incremental"
},
"op": "r",
"ts_ms": "1620393591654",
"ts_us": "1620393591654547",
"ts_ns": "1620393591654547920",
"transaction": null
}Code language: JSON / JSON with Comments (json)
Key fields in this structure:
- before: Represents the state of the row before the change (null for inserts).
- after: Represents the state of the row after the change (contains updated values).
- op: Operation type (c for create, r for read, u for update, d for delete).
- ts_ms: The timestamp (in milliseconds) when the change occurred.
5.2 Extracting the after field
To streamline clean data ingestion, we will extract only the after object from the CDC payload using a Debezium transformation.
Configure the Transformation:
Add the following lines to your MSK Connect properties to apply the transformation:
transforms=unwrap
transforms.unwrap.type=io.debezium.transforms.ExtractNewRecordState
This transformation extracts the after object and discards the rest of the payload.
Example Output After Transformation:
The transformed payload will have a flattened structure, such as:
{"product_id": 2, "product_name": "Smartphone Y", "brand": "Brand B", "price": 850.0, "quantity": 120}

{"product_id": 2, "product_name": "Smartphone Y", "brand": "Brand B", "price": 750.0, "quantity": 110}

{"product_id": 2, "product_name": "Smartphone Y", "brand": "Brand B", "price": 650.0, "quantity": 100}Code language: JSON / JSON with Comments (json)
5.3 Creating the schema in StarTree Cloud
The transformed data needs a schema in StarTree Cloud to define its structure.
Example Schema Definition:
{
"schemaName": "postgrescdc1", "enableColumnBasedNullHandling": true,
"primaryKeyColumns": ["product_id"],
"dimensionFieldSpecs": [
{ "name": "product_id", "dataType": "DOUBLE", "notNull": false },
{ "name": "product_name", "dataType": "STRING", "notNull": false },
{ "name": "brand", "dataType": "STRING", "notNull": false }, { "name": "price", "dataType": "DOUBLE", "notNull": false }, { "name": "quantity", "dataType": "DOUBLE", "notNull": false } ],
"dateTimeFieldSpecs": [
{ "name": "tsmp", "dataType": "TIMESTAMP", "fieldType": "DATE_TIME", "notNull": false, "format": "TIMESTAMP", "granularity": "1:MILLISECONDS" }
]
}Code language: JSON / JSON with Comments (json)- dimensionFieldSpecs: Fields used for filtering and grouping.
- metricFieldSpecs: Fields that can be aggregated (e.g., SUM, AVG).
- dateTimeFieldSpecs: A timestamp field for partitioning and querying by time.
API call to create the schema: Use the StarTree Cloud API to create the schema:
curl --location 'https://broker.pinot.celpxu.cp.s7e.startree.cloud:443/schemas/'
--header 'Authorization: Bearer <>
--header 'Content-Type: application/json'
--data @schema_config.json  https://broker.pinot.celpxu.cp.s7e.startree.cloud:443/schemas/schemasCode language: PHP (php)
5.4 Creating the table configuration
Next, define a table configuration to specify how the data is ingested into StarTree.
Example Table Configuration:
{ "tableName": "postgrescdc_REALTIME", "tableType": "REALTIME", "segmentsConfig": { "segmentPushType": "APPEND", "timeColumnName": "tsmp", "retentionTimeUnit": "DAYS", "retentionTimeValue": "5", "segmentAssignmentStrategy": "BalanceNumSegmentAssignmentStrategy", "replicasPerPartition": "1", "minimizeDataMovement": false, "deletedSegmentsRetentionPeriod": "7d", "replication": "1", "schemaName": "postgrescdc2" }, "tenants": { "broker": "DefaultTenant", "server": "DefaultTenant" }, "tableIndexConfig": { "rangeIndexVersion": 2, "aggregateMetrics": false, "optimizeDictionary": false, "autoGeneratedInvertedIndex": false, "enableDefaultStarTree": false, "nullHandlingEnabled": false, "createInvertedIndexDuringSegmentGeneration": false, "enableDynamicStarTreeCreation": false, "columnMajorSegmentBuilderEnabled": true, "optimizeDictionaryForMetrics": false, "noDictionarySizeRatioThreshold": 0.85 }, "metadata": {}, "routing": { "instanceSelectorType": "strictReplicaGroup" }, "upsertConfig": { "mode": "PARTIAL", "defaultPartialUpsertStrategy": "OVERWRITE", "dropOutOfOrderRecord": true, "partialUpsertStrategies": {}, "enableSnapshot": true, "enablePreload": true }, "ingestionConfig": { "streamIngestionConfig": { "streamConfigMaps": [ { "realtime.segment.flush.threshold.rows": "0", "stream.kafka.decoder.prop.format": "JSON", "security.protocol": "SASL_SSL", "stream.kafka.decoder.class.name": "org.apache.pinot.plugin.inputformat.json.JSONMessageDecoder", "streamType": "kafka", "sasl.mechanism": "AWS_MSK_IAM", "sasl.jaas.config": "org.apache.pinot.shaded.software.amazon.msk.auth.iam.IAMLoginModule required awsRoleArn="arn:aws:iam::054037095750:role/AWSMSKConnect";", "sasl.client.callback.handler.class": "org.apache.pinot.shaded.software.amazon.msk.auth.iam.IAMClientCallbackHandler", "realtime.segment.flush.threshold.segment.size": "800M", "stream.kafka.consumer.type": "lowlevel", "realtime.segment.flush.threshold.time": "24h", "stream.kafka.broker.list": <>, "stream.kafka.consumer.factory.class.name": "org.apache.pinot.plugin.stream.kafka20.KafkaConsumerFactory", "stream.kafka.consumer.prop.auto.offset.reset": "smallest", "stream.kafka.topic.name": <> } ], "trackFilteredMessageOffsets": false, "columnMajorSegmentBuilderEnabled": false }, "segmentTimeValueCheck": false, "continueOnError": true, "rowTimeValueCheck": true, "transformConfigs": [] }, "isDimTable": false }Code language: JSON / JSON with Comments (json)- schemaName: References the schema created earlier.
- UPSERTS: Enabling upserts in your data pipeline ensures that the latest changes in your row-level data are accurately reflected in downstream systems, preventing duplication and inconsistencies. With upserts, you can overwrite existing records, append new ones, or increment specific fields for aggregations. Additionally, using an upsert snapshot mode allows for efficient initial data loads followed by real-time updates. Choosing the appropriate upsert strategy—such as overwrite, append, increment, or snapshot—depends on your use case and the nature of the data being ingested. Proper configuration ensures both data accuracy and optimal query performance.
API Call to Create the Table: Use the StarTree Cloud API to create the table:
curl -X POST -H "Authorization: Bearer <YOUR_ACCESS_TOKEN>" -H "Content-Type: application/json" -d @table_config.json https://broker.pinot.celpxu.cp.s7e.startree.cloud:443/schemas/tablesCode language: JavaScript (javascript)6. Quick validation and queries
- Wait for Connector Success Notification:Although you might see success logs in the CloudWatch console, it is best to wait for the connector to transition to the “Running” stage. This ensures that the configuration is fully operational.

- Verify Topic Creation:Use the Kafka topic list command to check if the connector has created the necessary topics for the data stream:
kafka-topics.sh --list --bootstrap-server <>- Look for the topic matching your configuration (e.g., postgres).
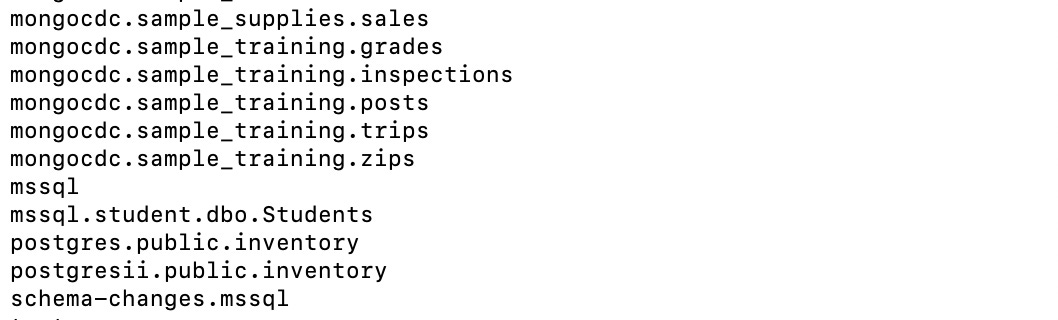
- Look for the topic matching your configuration (e.g., postgres).
- Monitor Logs:
- Use Kafka and StarTree Cloud logs to troubleshoot ingestion issues:
- Kafka Logs: Ensure the connector is producing messages to the topic.
- StarTree Logs: Check for errors or warnings during ingestion.
- Verify Schema in StarTree Cloud:
- Use the StarTree Cloud API or the UI to confirm that the schema and table configurations are correctly loaded and active.
7. Troubleshooting and tips
When working with MSK Connect and StarTree Cloud, it’s essential to address common pitfalls and ensure proper debugging practices. This section outlines key areas to verify, along with tips for effective troubleshooting.
7.1 Java version compatibility
- Java and Debezium versions:
- Ensure the Java version used for your Kafka Connect workers is compatible with the Debezium connector version you’re using.
- Refer to the Debezium Version Compatibility Matrix provided earlier for details on supported Kafka and Java versions.
- Example: Debezium 2.x connectors require Java 11 or higher.
7.2 Enable detailed logging
Logging is crucial for diagnosing issues during setup and operation. Follow these steps to enable detailed logging for your connector:
- Modify log configuration:
Add DEBUG and TRACE logging to your connector properties file. For example:

log4j.rootLogger=DEBUG, stdout
log4j.logger.io.debezium=DEBUG
log4j.logger.org.apache.kafka.connect.runtime=DEBUG
log4j.logger.org.apache.kafka.common.network=TRACE
log4j.logger.io.debezium.connector.postgresql=TRACE- These settings will provide detailed logs for Debezium, Kafka Connect runtime, and network interactions.
- Trace key issues:
- Schema Mismatches: Logs will indicate if the incoming data doesn’t match the schema defined in StarTree Cloud.
- Authentication Errors: Debug logs can pinpoint IAM or TLS authentication failures.
- Kafka Connection Issues: TRACE-level logs will detail any communication issues between Kafka Connect and the brokers.
- Monitor logs in real time:Use the Kafka Connect logs to identify issues during ingestion:
tail -f connect.log
7.3 Common issues and solutions
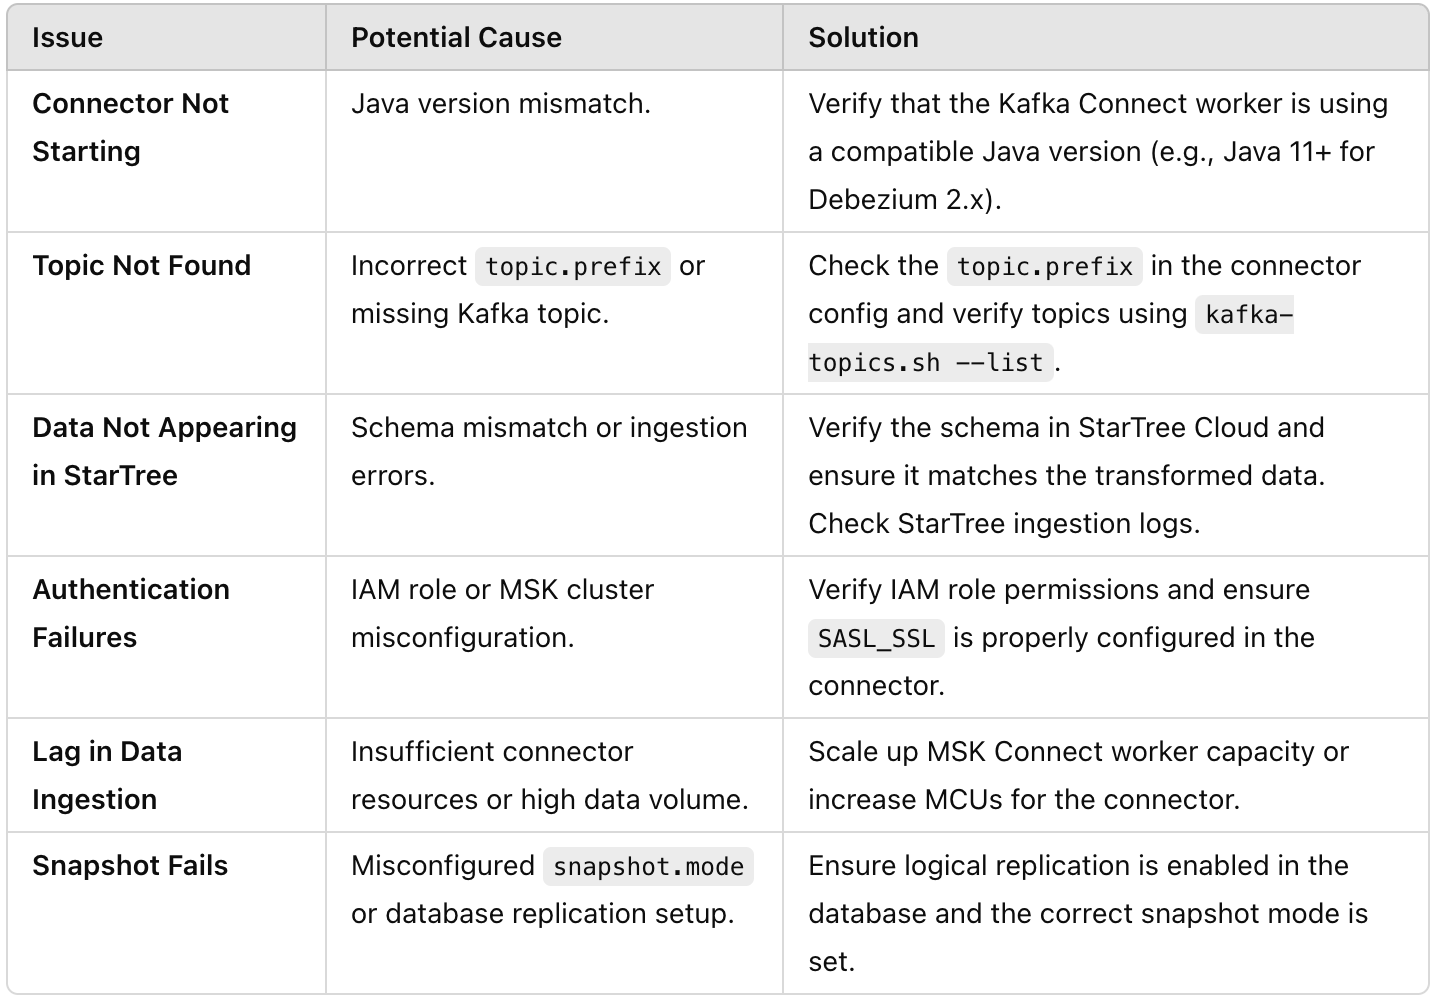
Conclusion
The integration pattern outlined in this guide demonstrates the immense value of combining Debezium, Amazon MSK, and StarTree Cloud to achieve seamless real-time analytics. By supporting CDC from more than seven databases, this solution provides unparalleled flexibility for integrating diverse data sources. The ability to process and analyze changes in real time empowers businesses to make data-driven decisions with subsecond latency, unlocking new opportunities for operational efficiency and enhanced customer experiences.
References
- https://startree.ai/saas-signup
- https://dev.startree.ai/docs/pinot/recipes/debezium-cdc
- https://aws.amazon.com/blogs/aws/introducing-amazon-msk-connect-stream-data-to-and-from-your-apache-kafka-clusters-using-managed-connectors/
- https://debezium.io
- https://debezium.io/documentation/reference/stable/index.html
- https://debezium.io/releases/
- https://mvnrepository.com/artifact/io.debezium/debezium-connector-postgres
- https://github.com/ayesheepatra/debezium-cdc-startree/tree/main
Get started with StarTree Cloud today
Interested in how your organization can improve queries and reduce costs with StarTree Cloud? Contact us for a demo. We’d love to listen to your needs, understand your use case, and answer any questions you may have on whether StarTree Cloud is the best database for your real-time analytics needs.