How do you get started with Apache Pinot™? Good question! To save you the hassle of trying to tackle this on your own, here’s a handy guide that overviews all of the components that make up Pinot and how to set Pinot up.
The Obligatory What is Apache Pinot and StarTree Section
Pinot is an open source, free-to-use, real-time, and distributed OLAP datastore, purpose built to provide ultra low-latency analytics at extremely high throughput.
StarTree offers a fully managed version of the Apache Pinot real-time analytics system and other tools around it, such as a real-time anomaly detection and root cause analysis tool, which you can try for free.
What do you need to run Apache Pinot?
The Docker image that we will use runs multiple services. To accommodate this, we recommend at a minimum the following resources in order to run the sample:
- CPUs: four or more
- Memory: 8 GB or more
- Swap: 2 GB or more
- Disk space: 10 GB or more
Note: When importing custom data or event streaming, you may need more resources. Additionally, note that if not set, Docker will use resources from the host environment as needed and available.
Step-by-step installation of Apache Pinot
For this intro tutorial, we will use Docker. Alternatively, you can run Pinot locally if you wish.
The instructions use a Windows 11 computer, but they will work on Macs as well. Also note that I am using VS Code with the Docker extension installed.
Step 1:
Make sure you have Docker installed on your machine.
Docker is a set of platform as a service (PaaS) products that use OS-level virtualization to deliver software in packages called containers.
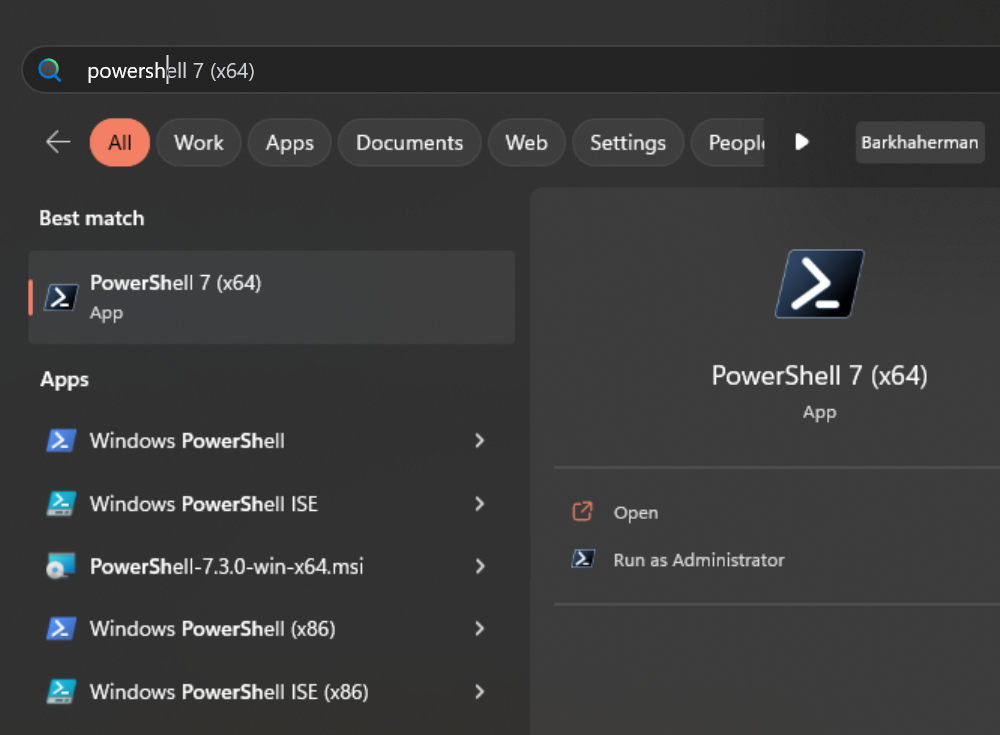
Step 2:
Now, let’s download the Docker image. On a Windows machine, start a new PowerShell command window. Note that this is not the same as a Windows PowerShell command window, as shown below.
Use the following command to get (pull) the image we are looking for:
docker pull apachepinot/pinot:0.12.0
You can also download the latest version like so:
docker pull apachepinot/pinot:latest
Here, apachepinot is the name of the repository in Docker Hub, pinot is the name of the image, and :latest or :0.12.0 is the version for the image. Note that we will be using the 0.12.0 version for this blog post.
Docker Hub is the world’s largest repository of container images in the world.
You can verify the image was downloaded or pulled by running the following command:
docker images
It should show you the image like so:

Step 3:
Let’s run a container using the Docker image that we downloaded:
docker run -it –entrypoint /bin/bash -p 9000:9000 apachepinot/pinot:0.12.0

The docker run command runs the image. The -p 9000:00 option maps the docker container port 9000 to the local machine port 9000. This allows us to access the Pinot UI, which defaults to port 9000 to be accessible from the localhost. We are using the –entrypoint to override the default entrypoint and replace it with Bash. We want to override the default behavior so that we can start each component one at a time. The next parameter apachepinot/pinot:0.12.0 is the Docker image we pulled above.
After running the command, we’ll find ourselves in the Docker container instance running Bash shell. We can use ls to list the contents of the Docker container as shown above.
If you’re using VS Code, with the Docker extension installed, you can click on the Docker extension and see our container and its content:
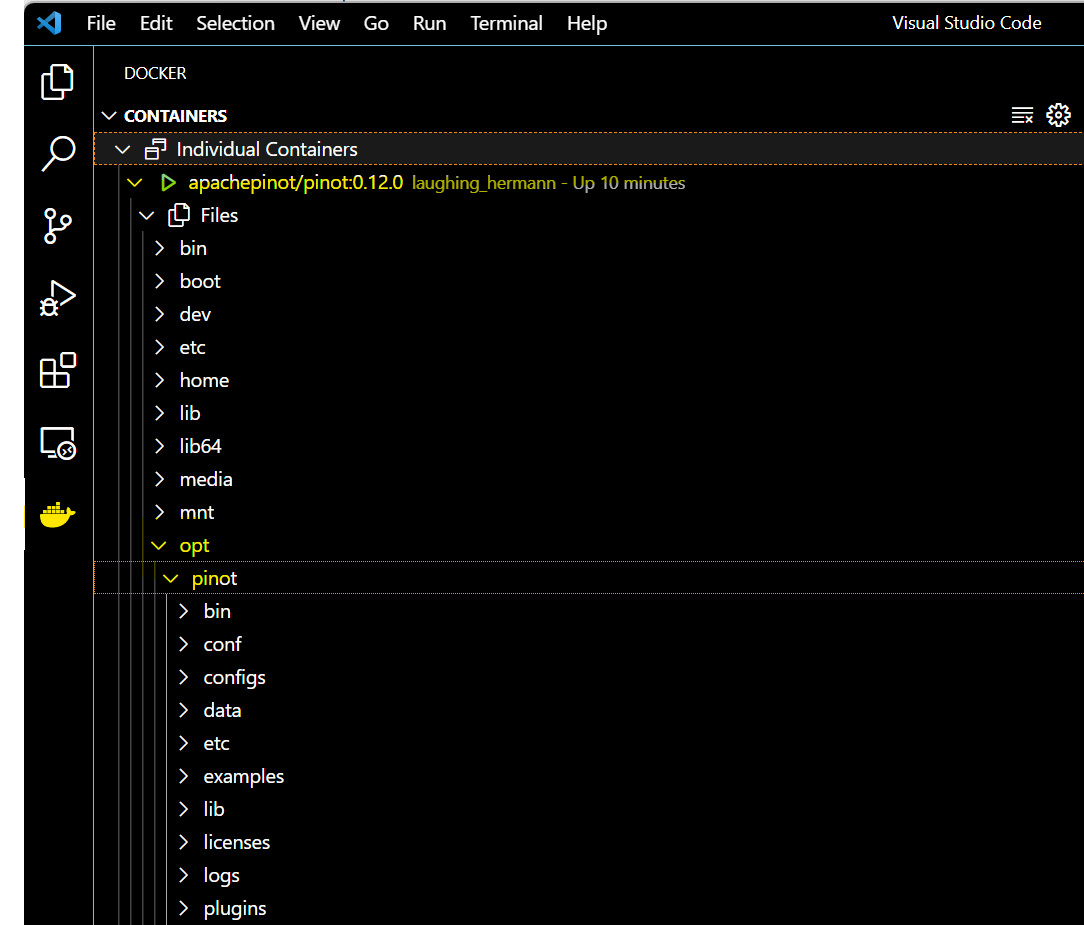
Click on the Docker icon in the left menu, and apachepinot/pinot:0.12.0 . This should take a few seconds to connect to the running container. Now, you can navigate to the files and see what we have under the opt folder.
Step 4:
Let’s run the components that are essential to running a Pinot cluster. Change directory to the bin folder and list the contents like so:

In order to start the Pinot cluster, we will need to run the following essential components:
- Apache ZooKeeper™
- Controller
- Broker
- Server
Start ZooKeeper using the following command:
./pinot-admin.sh StartZookeeper &
pinot-admin.sh is a shell script for starting the various components. The & allows us to continue using the Bash shell. ZooKeeper is responsible for the configuration for the Pinot cluster and needs to be started first.
We can start the remaining components using these commands one at a time:
./pinot-admin.sh StartController & ./pinot-admin.sh StartBroker & ./pinot-admin.sh StartServer &Copy
The controller controls the cluster health and coordinates with ZooKeeper for configuration and status changes. The broker is responsible for query distribution and result collation, sometimes called Scatter-Gather. Servers manage individual table segments and perform the actual read/writes. To get a better understanding of each component, read this intro to Apache Pinot.
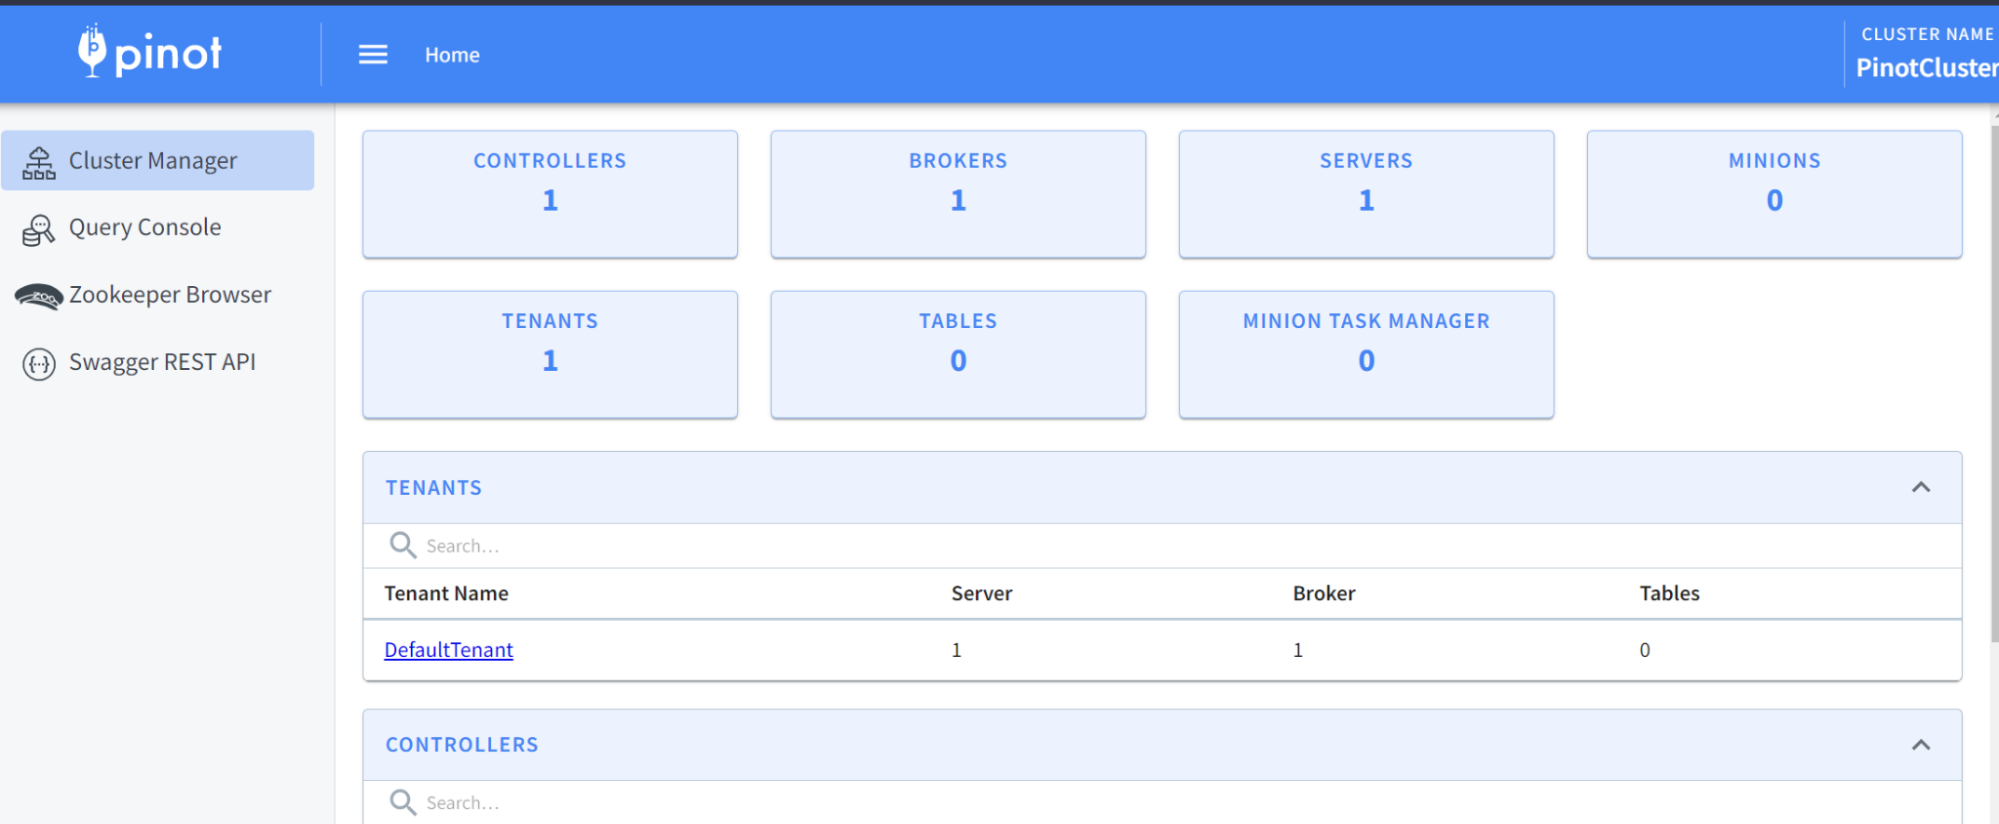
At this time, we should have a running Pinot cluster. We can verify via the Pinot Data Explorer by browsing to localhost:9000 . You should see something like this:
What just happened?
Let’s dive in.
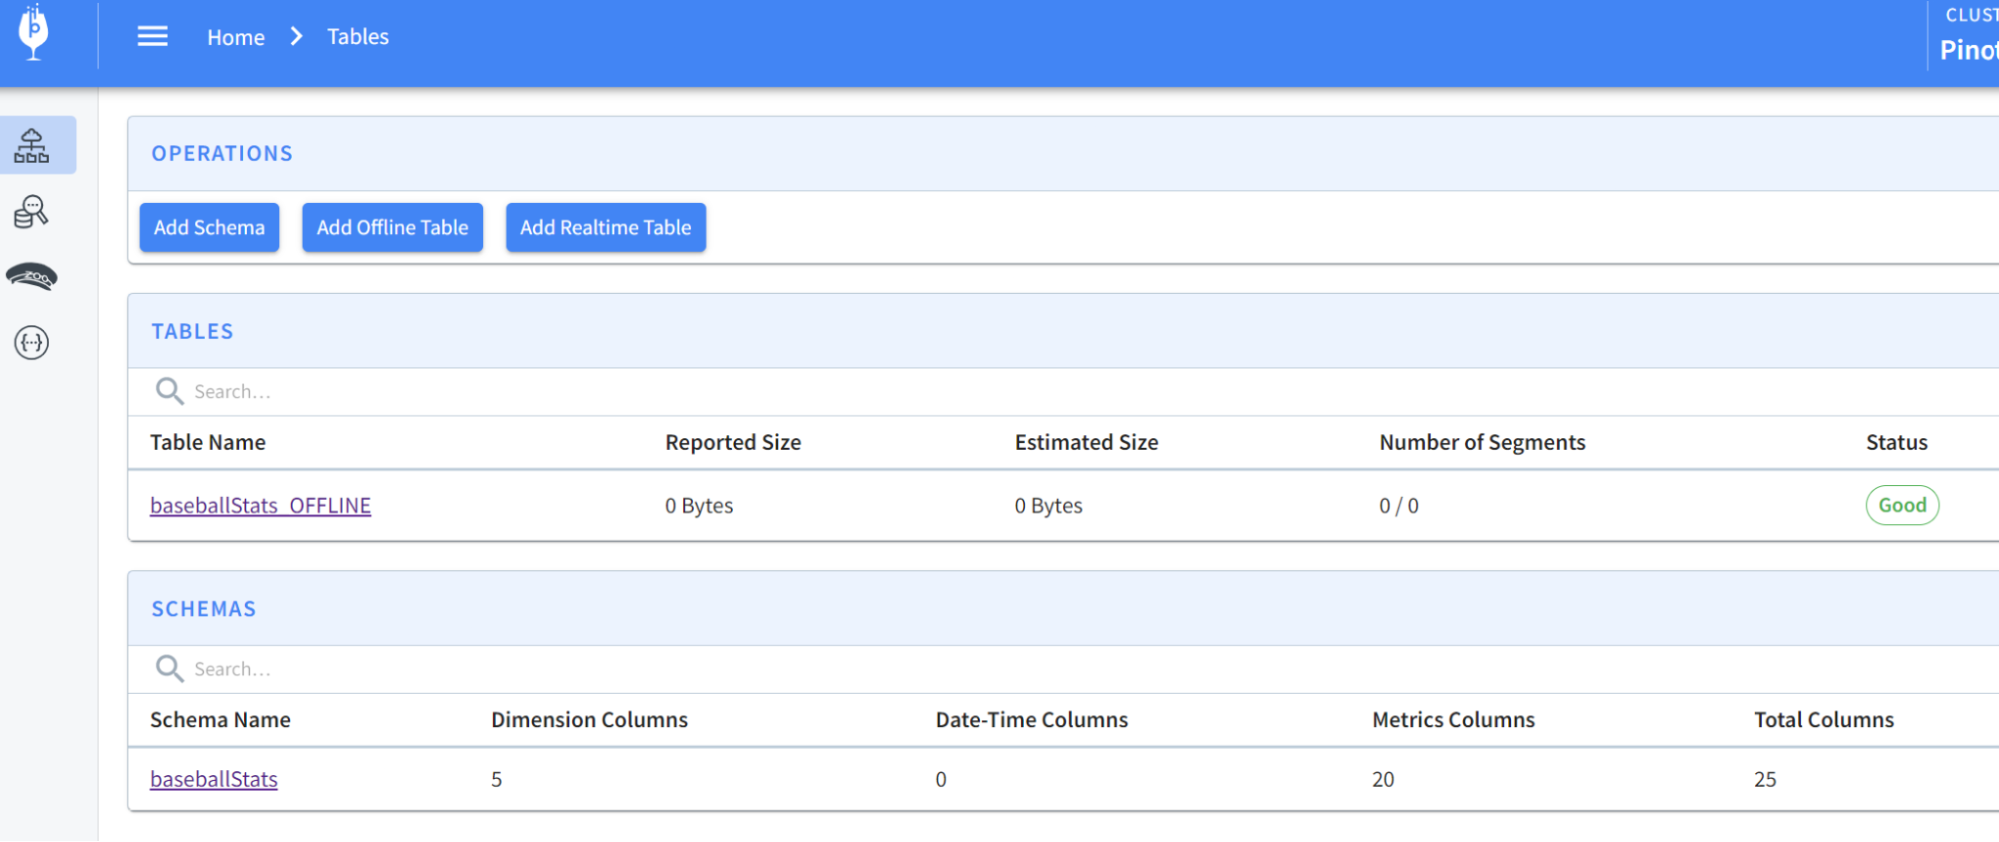
We have started the four essential components of Pinot, however, you will note that there is not yet any data in our fresh new instance.
Before we create a table and load data, notice the four navigation menus on the left-hand side. You can look at the cluster status, run queries, inspect ZooKeeper, or launch the Swagger endpoints for the REST API that Pinot supports.
On the cluster, we notice that we have the essentials deployed: controller, broker, and server. Currently, there are no tables and no minions—dispatchable components used for task management—exist, though Notice also that multi-tenancy support is available in the cluster manager.
Step 5:
Now that we have our Apache Pinot cluster ready, let’s load some data. Of course, before we do that, we have to create a schema.
Let’s navigate to the folder:
cd /opt/pinot/examples/batch/baseballStats
You will notice that there are the following files listed here:
baseballStats_offline_table_config.json baseballStats_schema.json ingestionJobSpec.yaml sparkIngestionJobSpec.yaml rawdataCode language: CSS (css)Copy
From the names, we can see that there is a schema file, a table config file, an ingestion job, and Apache Spark™ ingestion job files as well as a raw data folder.
The content of the schema file contains both metric and dimension like so (abbreviated):
{ "metricFieldSpecs": [ { "dataType": "INT", "name": "playerStint" }, … { "dataType": "INT", "name": "baseOnBalls" }, ], "dimensionFieldSpecs": [ { "dataType": "STRING", "name": "playerID" }, …. { "dataType": "STRING", "name": "playerName" } ], "schemaName": "baseballStats" }Code language: JSON / JSON with Comments (json)Copy
To create a schema and table for the baseball stats file, run the following command from the /app/pinot/bin folder:
./pinot-admin.sh AddTable -schemaFile /opt/pinot/examples/batch/baseballStats/baseballStats_schema.json -tableConfigFile /opt/pinot/examples/batch/baseballStats/baseballStats_offline_table_config.json -execCopy
You should now see the schema and table created:
Next, we’ll want to load some data into the table that we created. We have some sample data in the folder rawdata that we can use to load. We will need a YAML file to perform the actual ingestion job and can use the following command to import data:
./pinot-admin.sh LaunchDataIngestionJob -jobSpecFile /opt/pinot/examples/batch/baseballStats/ingestionJobSpec.yaml Copy
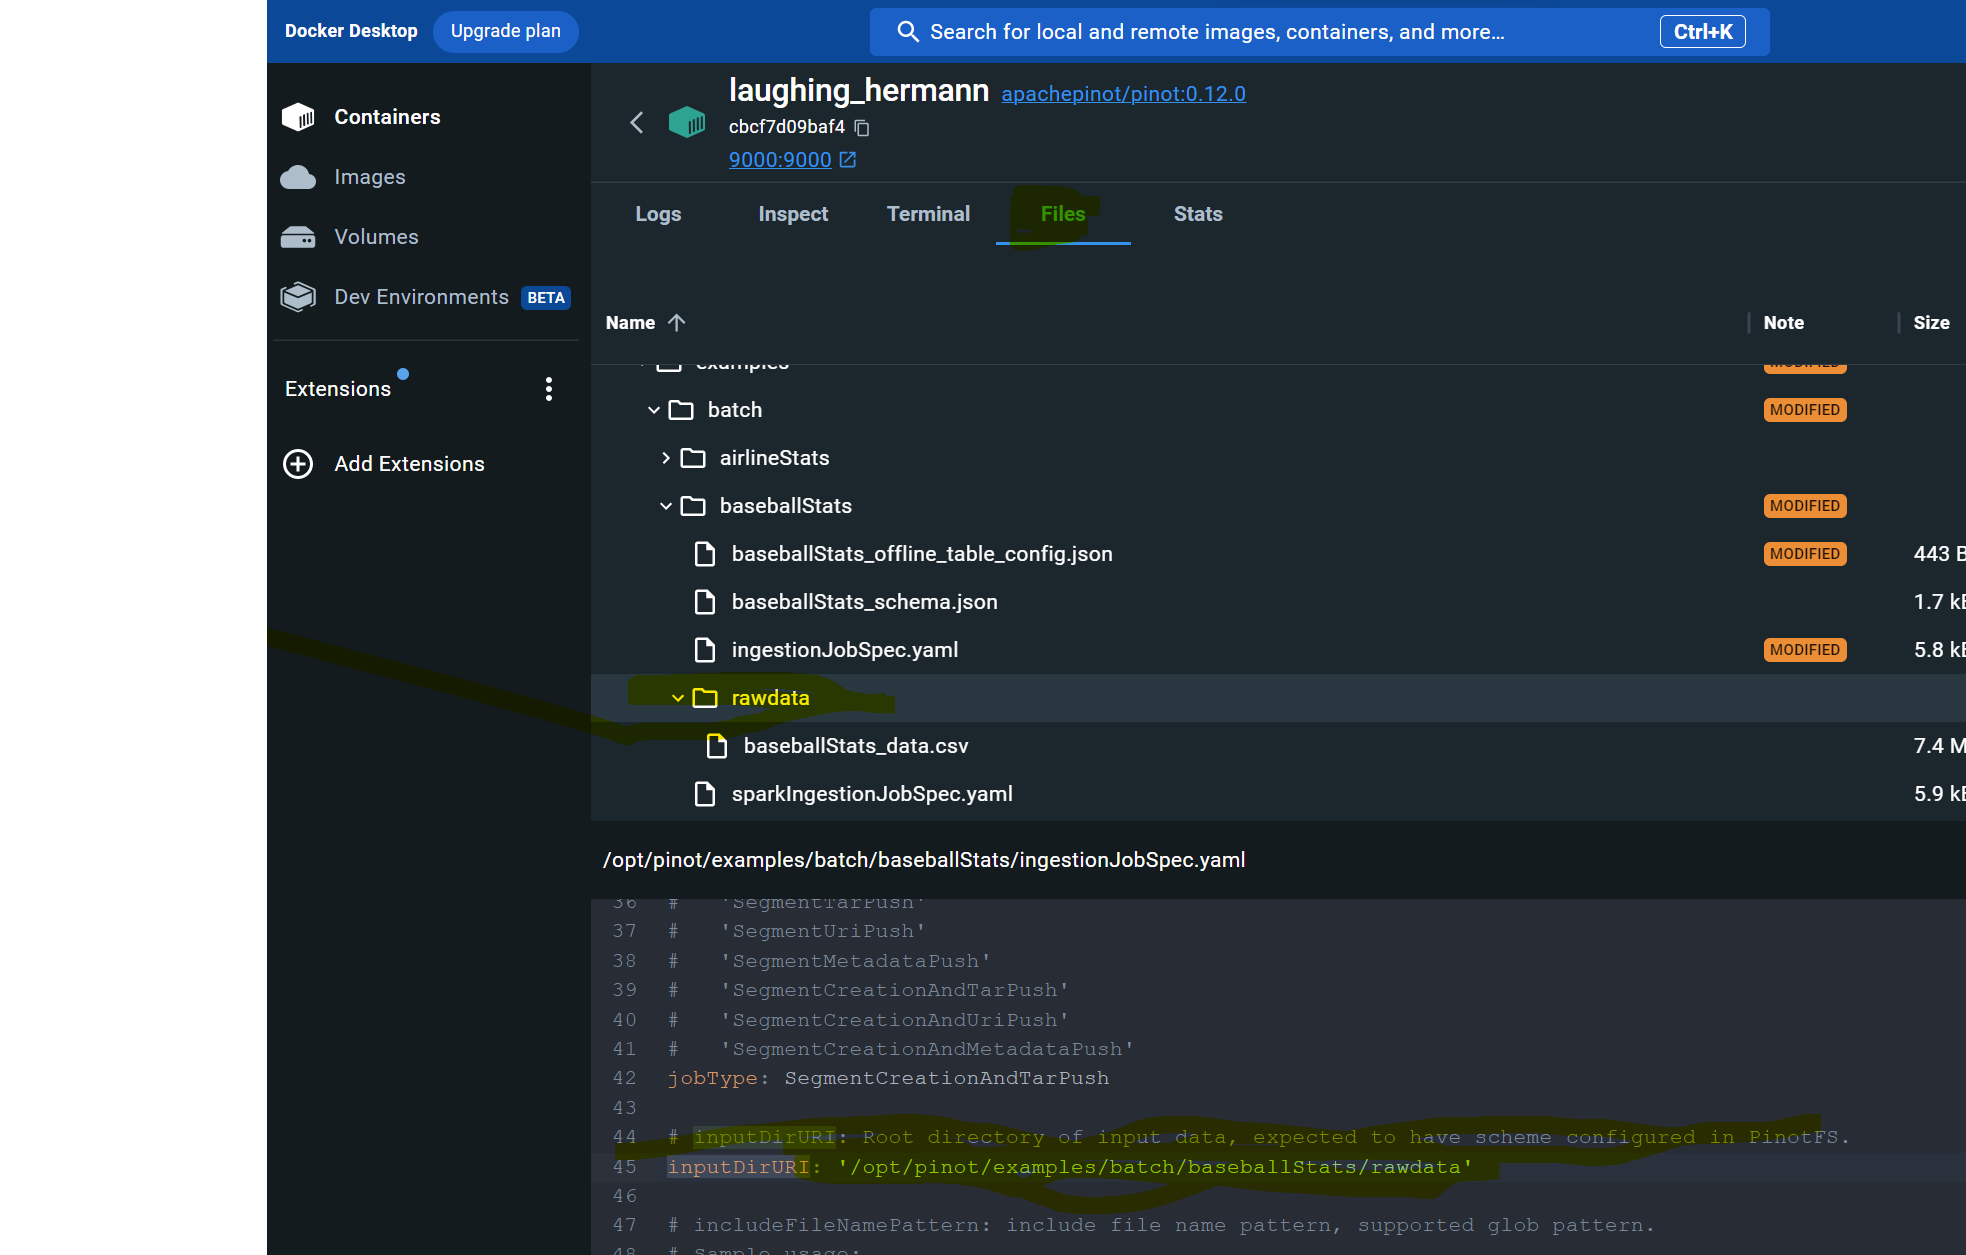
If you run into trouble on this step like I did, edit the ingestJobSpec.yaml file using Docker Desktop to change the inputDirURI from relative to absolute path. Then rerun the above command.
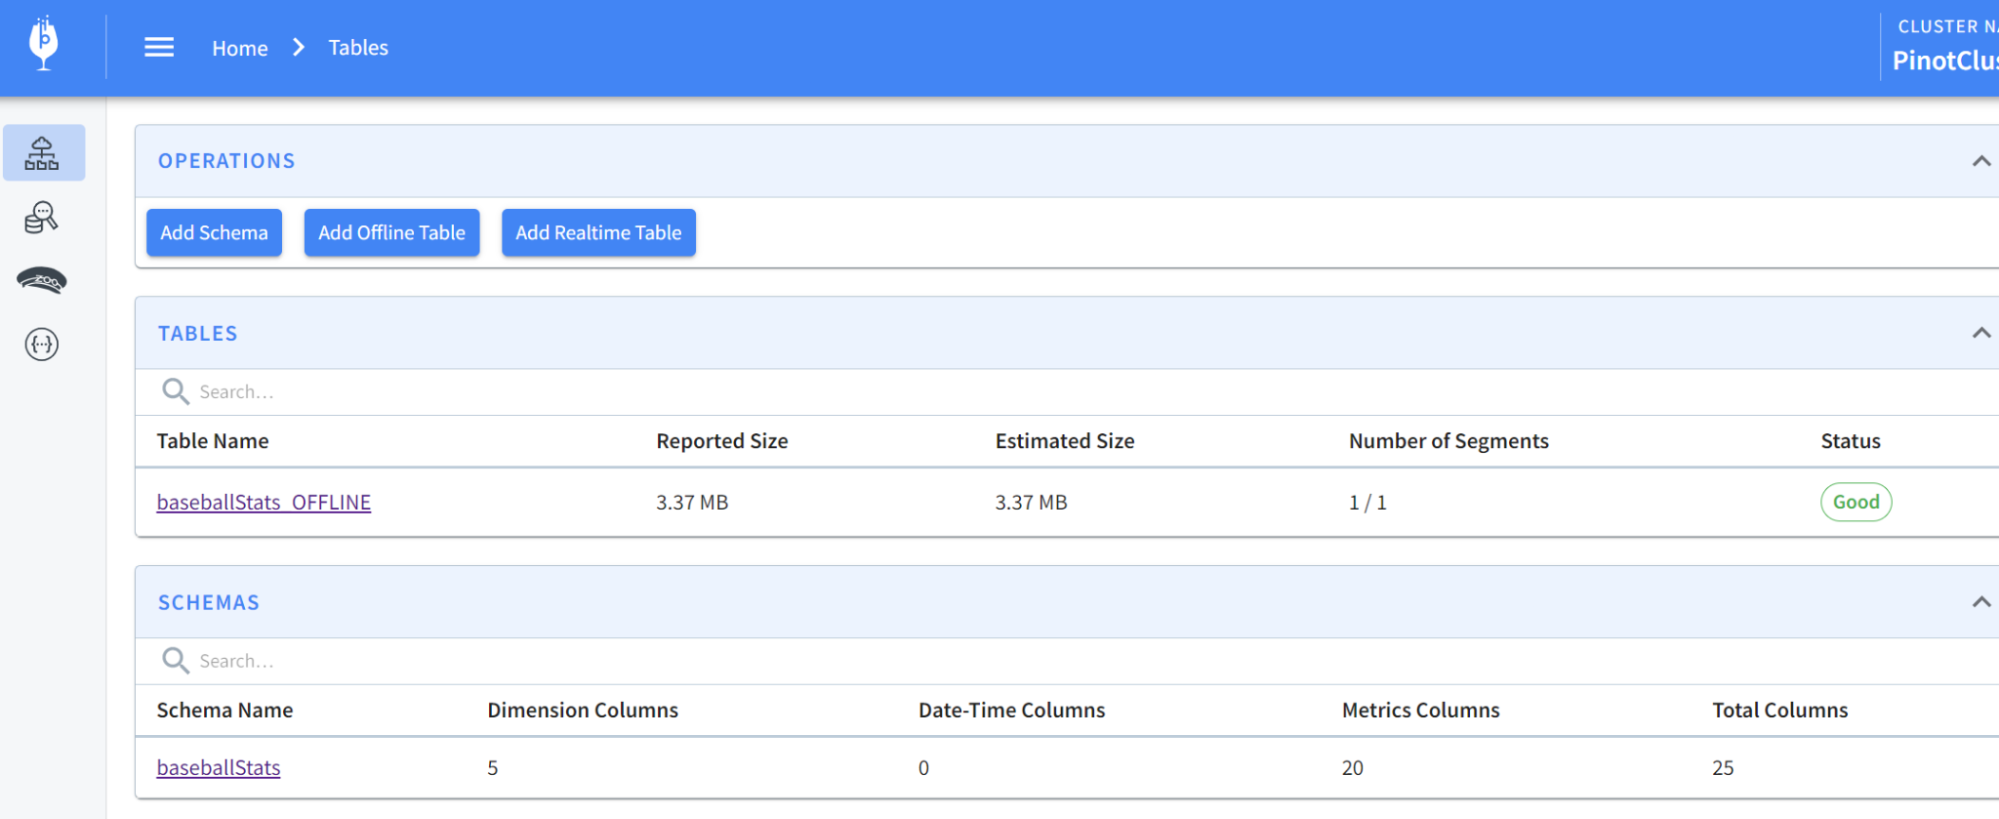
You should now be able to see the table has been populated like so:
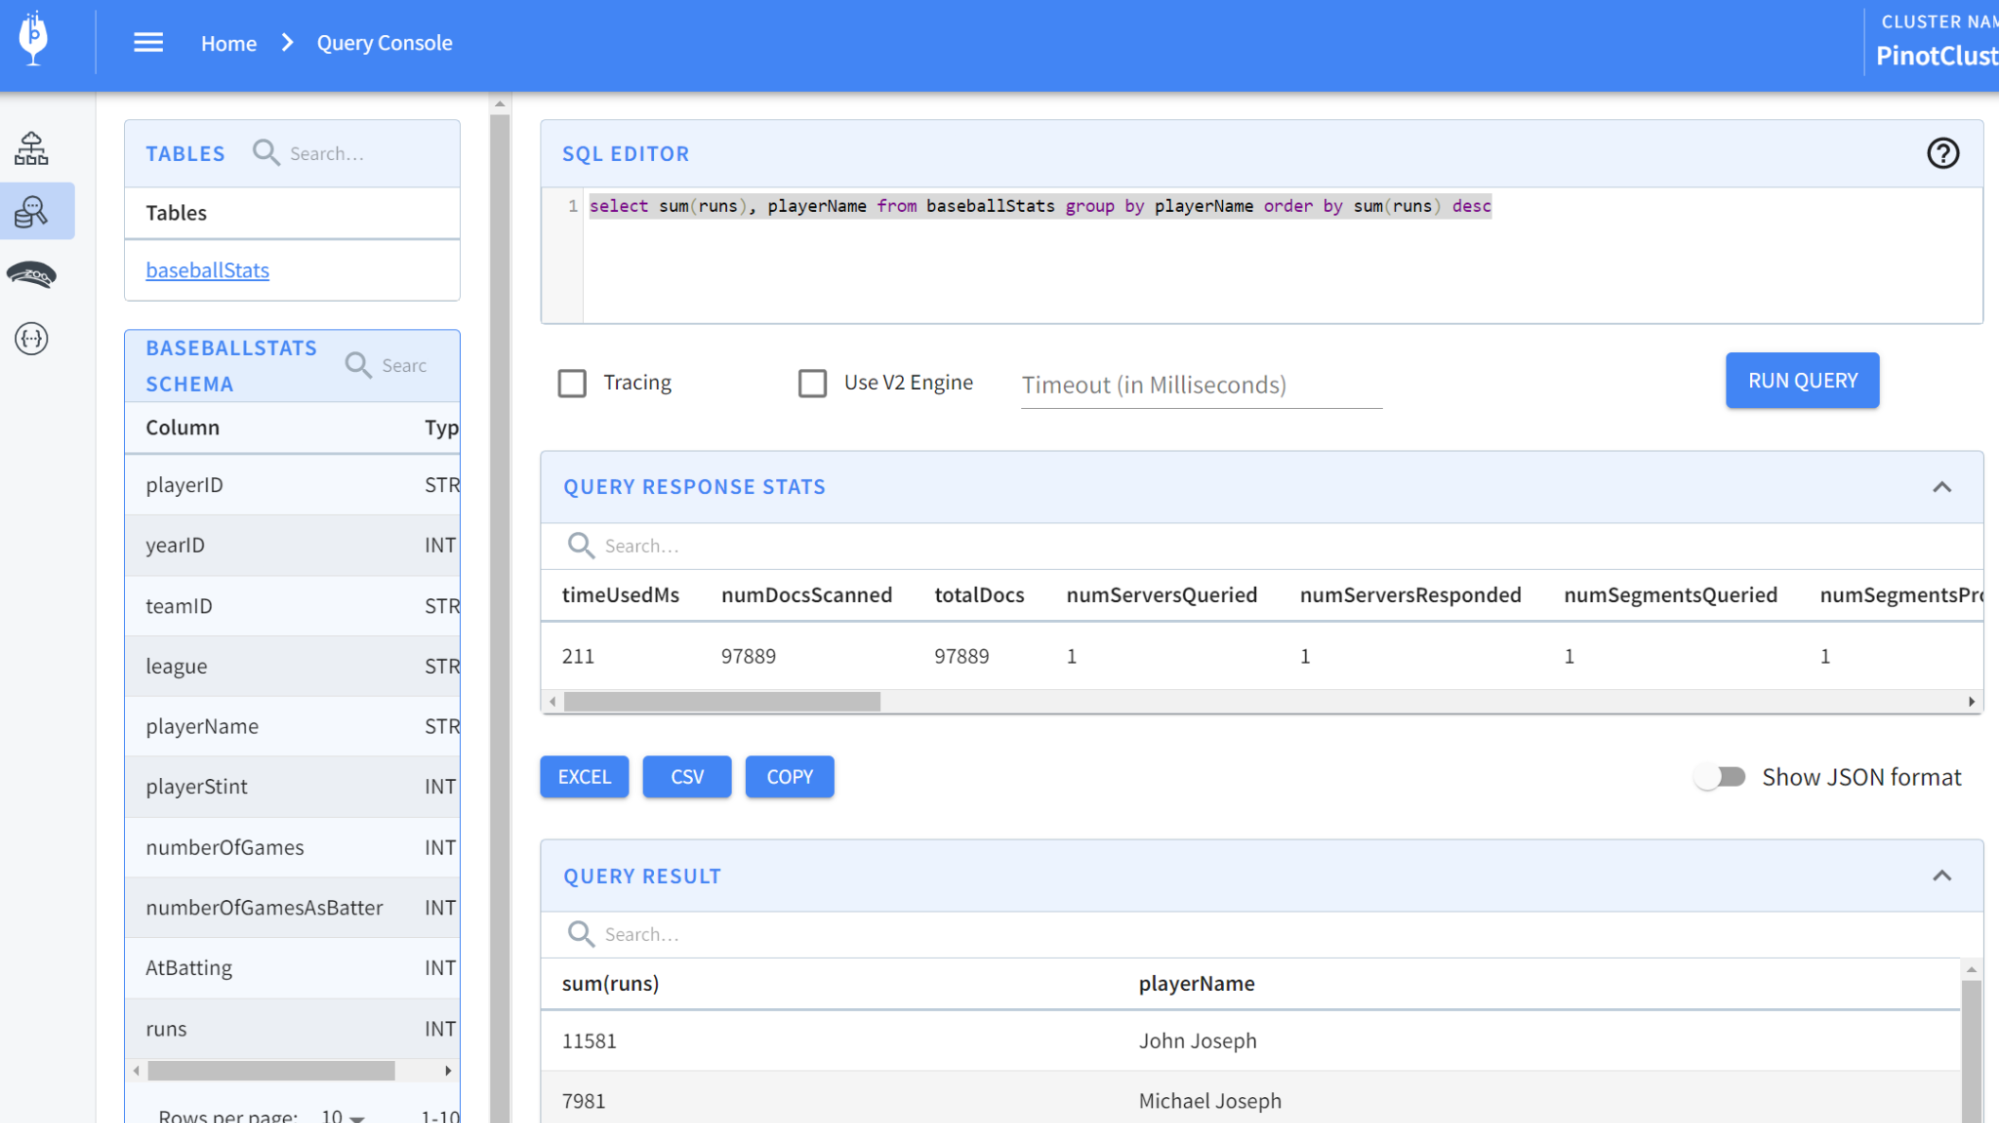
Now, let’s run some queries. From localhost:9000 , select the Query Console in the left-hand menu. Then type in some of these queries:
select * from baseballStats limit 10 select sum(runs), playerName from baseballStats group by playerName order by sum(runs) descCode language: JavaScript (javascript)Copy
You should see results like so:
And there you have it!
What’s under the hood?
If you’re curious to go a step further and see what the segments look like and what the actual data on disk looks like, keep reading! In the Tables section of localhost:9000 , you can scroll down to find a segment:
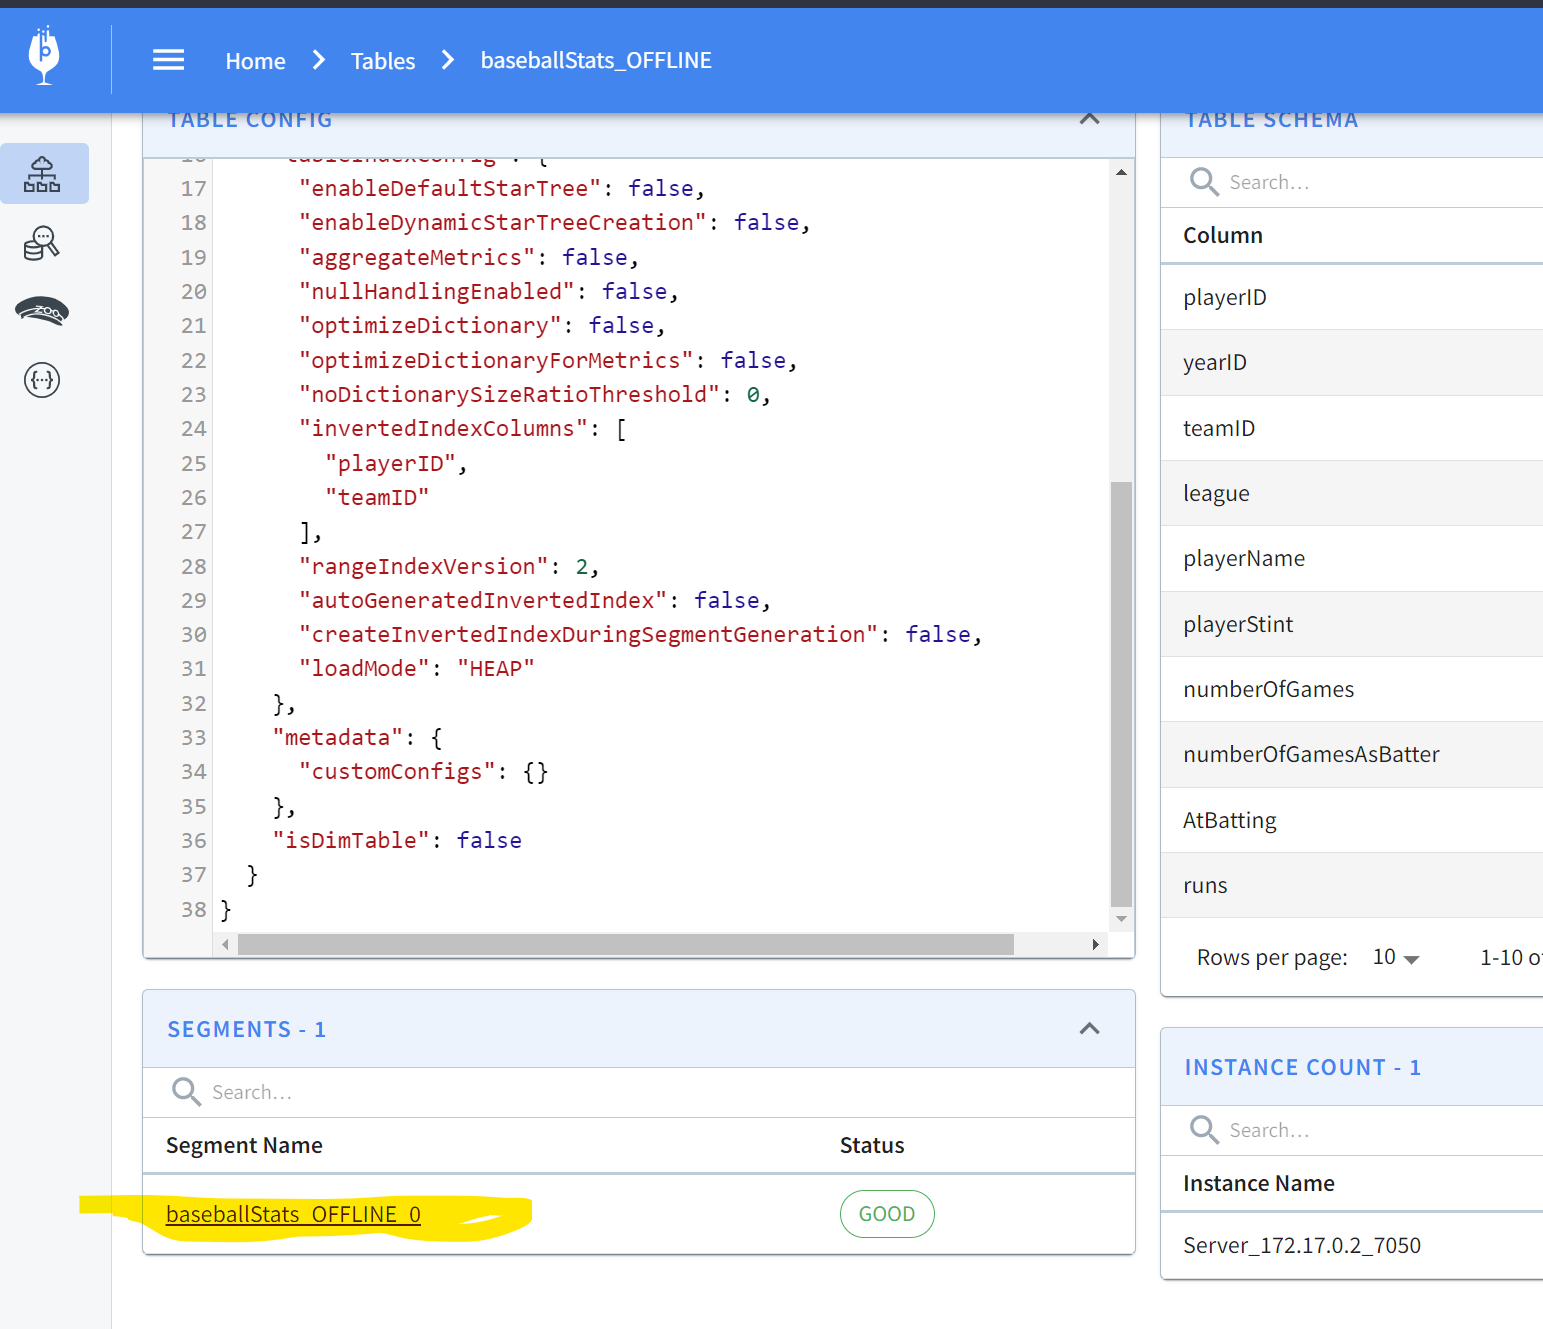
Clicking on this gives the specifics of the segment:
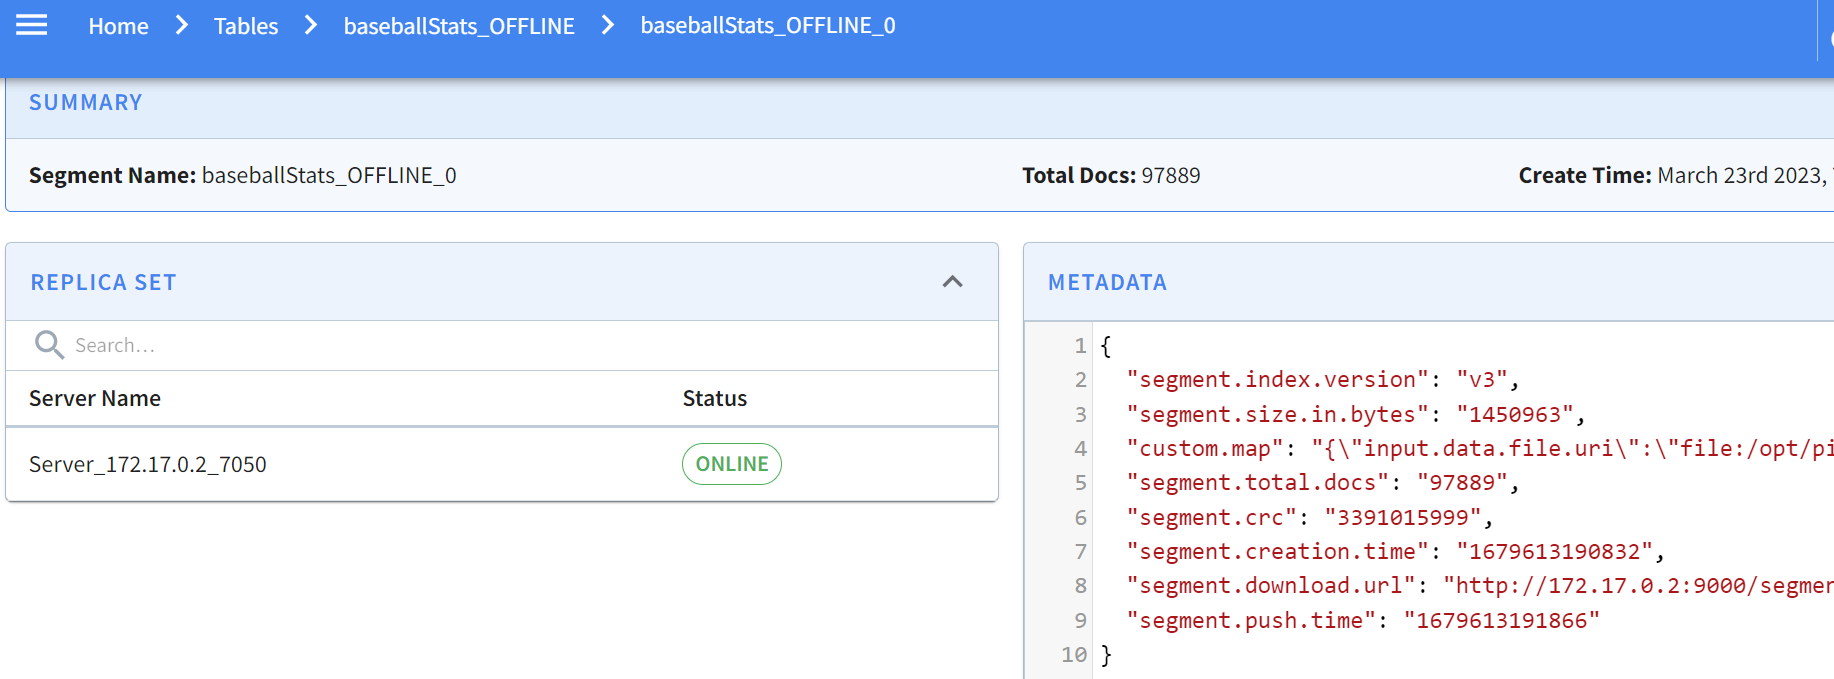
Pinot allows you to easily inspect your segments and tables in one easy-to-use UI. You can find what’s where and keep an eye on size, location, number of documents, etc.
Conclusion
Congratulations!
Together, we’ve:
- Installed and ran Apache Pinot components
- Created a table schema and a table
- Loaded data in a table
- Ran a few queries
- Explored the Pinot UI
In my next article, we’ll consume event streaming data using Apache Pinot and Apache Kafka®.
In the meantime, run more queries, load more data, and don’t forget to join the Community Slack for support if you get stuck!